 This guide covers activity-specific elements of caving (also called caving/black-water rafting depending on the venue). For broader topics that apply across land-based activities, see our standalone reference guides:
- Working with Outdoor Education Providers
- Parent Communication for Land-Based Activities
- Student Preparation for Land-Based Activities
- Behaviour Management Outdoors
- How to Debrief Outdoor Experiences
- Land and Bush Safety Foundations
1. Quick Overview
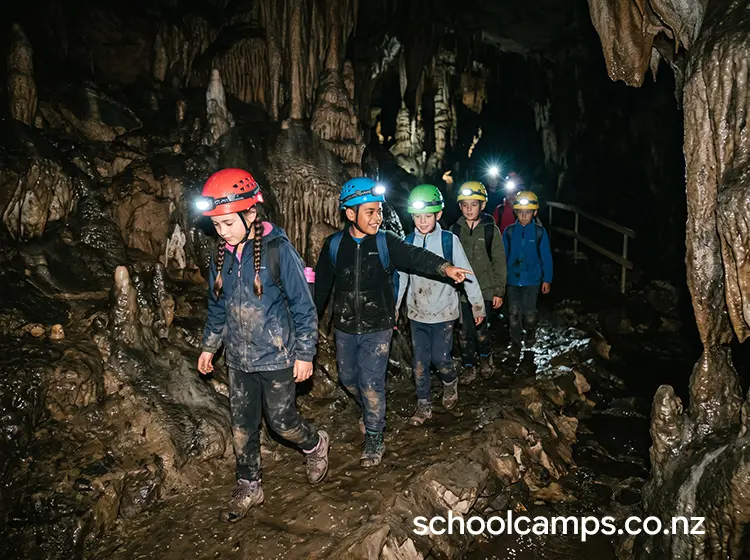
New Zealand’s limestone regions (most famously Waitomo, but also the West Coast’s Oparara Basin and pockets of the central North Island) support a genuine caving tourism and education industry, almost always run through commercial guided operators rather than independently. Sessions range from a straightforward walk-through show cave to a more adventurous “wild cave” trip involving scrambling, wading, and sometimes an underground abseil, always led by a qualified guide who knows the specific cave system.
Schools choose it because it’s a genuinely novel sensory experience most students have never had (total darkness, unusual acoustics, distinctive geology and glow-worms in some systems), works well as a highlight activity within a wider camp itinerary, and requires no activity-specific fitness beyond a reasonable comfort with confined, dark spaces.
Typical duration options
- Taster/show cave session (1–1.5 hours): a guided walk through a developed show cave with lighting and formed paths: minimal physical demand, strong sensory experience.
- Half-day adventure caving (2.5–4 hours): a “wild cave” experience with scrambling, wading through shallow water, and basic caving movement, always guided.
- Full-day session (5–7 hours): an extended adventure caving trip, potentially including an underground abseil or a black-water tubing component, for older, well-prepared groups with a specialist provider.
2. Learning Outcomes Teachers Can Actually Use
Personal skills: manages anxiety in an unfamiliar, dark, enclosed environment; builds confidence through a genuinely novel physical and sensory challenge; practises calm decision-making when sensory input (light, sound, footing) is reduced.
Social skills: supports a nervous group member in the dark through verbal reassurance rather than physical crowding; maintains group cohesion and spacing on narrow or slippery sections; communicates clearly using voice when visual cues are limited.
Outdoor/technical skills: learns basic movement techniques for confined, uneven underground terrain; understands correct use and care of caving-specific equipment (helmet, headlamp, wetsuit if wading is involved); develops awareness of cave conservation practices (not touching formations, staying on marked routes).
Thinking skills: processes an unfamiliar environment methodically rather than reactively; makes careful footing and handhold decisions with reduced visual information; retains and follows sequential guide instructions in a low-light setting.
Wellbeing: experiences a distinctive form of achievement tied to working through initial discomfort or mild fear of the dark or confined spaces; often shifts a student’s self-concept around what they’re capable of; the sensory novelty (silence, darkness, glow-worms) frequently produces genuine wonder and is commonly cited by students as a camp highlight.
3. Best Year Levels and Group Sizes
Suggested year levels
- Year 4–6: show cave / developed cave tours only, with strong lighting, formed paths, and no wading or scrambling.
- Year 7–8: show cave tours, or an easier guided adventure cave option with minimal wading and no technical rope work.
- Year 9–13: full range including adventure caving with wading and scrambling, and (for well-prepared senior groups with a specialist provider) an underground abseil or black-water component.
Group size guidance
- Whole class (25–30 students): show cave tours handle this well in one or two guided groups; adventure caving needs smaller sub-groups (8–12) with a guide each, run sequentially or in parallel if the provider has capacity.
- Small groups (8–12 students): the standard group size for adventure/wild caving, matching typical guide ratios.
- Very large groups (60+): show caves can usually handle this across staggered tour times; adventure caving needs multiple guides and careful scheduling given cave capacity limits.
Ratios and supervision
As a general guide: a single guide can safely manage a full class group size (25–30) on a show cave tour with formed paths and constant lighting. For adventure/wild caving, ratios tighten to around 1:8–1:10, and any component involving an underground abseil or technical rope work needs 1:4–1:6 with a guide holding a current NZOIA Cave qualification.
4. Working with Providers
Deciding whether to run teacher-led or provider-led sessions, questions to ask providers, and what teachers should still do when working with external instructors:
See: Working with Outdoor Education Providers
Caving is essentially always provider-led: schools do not run this activity independently. Confirm the operator’s guides hold current NZOIA Cave qualifications (or equivalent local caving club experience recognised by the operator) and ask specifically about the cave system’s known hazards (water levels, tight sections, flood risk) before booking.
5. Planning Checklist
Permissions and communications
For parent letter templates, consent requirements, and addressing common parent concerns, see Parent Communication for Land-Based Activities. Claustrophobia and fear of the dark are common, specific parent and student concerns worth addressing directly and early: make clear that a show cave option or the ability to turn back exists for anyone who needs it.
Skills and fitness preparation
For general pre-camp confidence-building, see Student Preparation for Land-Based Activities. No specific fitness preparation is required for a show cave; a brief classroom conversation about what to expect (darkness, confined spaces, possible wading) helps manage first-time anxiety more than physical preparation does.
Gear and clothing
What’s provided (typical adventure caving trip): helmet with headlamp, wetsuit if wading or water contact is involved, and often caving-specific footwear.
What students bring: clothing that can get wet and dirty (worn under a provided wetsuit for adventure trips), a change of clothes and towel for after, enclosed shoes for a show cave tour.
Weather management: heavy rain can raise water levels in some cave systems and lead to a provider cancelling or modifying a trip at short notice: build this into your itinerary’s flexibility rather than treating it as a fixed booking.
Accessibility and inclusion
Confidence levels: offer a show cave alternative for any student who doesn’t want to attempt an adventure cave; make clear that turning back partway through is always an acceptable choice, never a failure.
Neurodiversity: warn students clearly in advance about sensory elements (darkness, echoing sound, confined spaces, cold water) so there are no surprises; allow a support person or buddy for students who find unfamiliar sensory environments harder to process; consider a shorter or show-cave option for students who would find full sensory immersion overwhelming.
Physical needs: show caves are typically accessible via formed paths, but check specific accessibility with the operator; adventure caving generally requires reasonable mobility and is not suited to all physical needs: discuss specific requirements directly with the provider well ahead of time.
Keeping everyone involved: pair anxious students with a calm, reassuring buddy; use a “no one goes last alone” rule so no single student feels isolated at the back of the group; celebrate participation and effort rather than how far into a challenging section someone went.
6. Safety, Risk, and Good Practice
Hazards to think about: slips on wet or uneven underground terrain; head strikes on low ceilings (mitigated by helmets, but awareness still matters); disorientation or panic in confined or dark sections; rising water levels in wet-weather conditions; hypothermia risk from prolonged contact with cold cave water; separation from the group in a complex cave system.
Key controls: a comprehensive briefing on movement technique, helmet and headlamp use, and group communication before entering the cave; a strict single-file, guide-led movement order with no student ever ahead of or significantly behind the group; a clear “stop and wait” protocol if anyone needs a break; constant headcounts at key points in the system.
Roles on the day: a designated decision-maker (lead guide) with full authority over route, pace, and whether to turn back; a second guide or competent adult at the rear of the group on any adventure caving trip; a first aid and thermal management plan (spare warm clothing, hot drinks) for any trip involving water contact.
When to stop or switch plans (red flags)
Stop immediately if: water levels are rising or the guide identifies changed conditions in the system; a student shows signs of panic or genuine distress that reassurance isn’t resolving; a student becomes separated from the group’s sightline, however briefly; anyone shows signs of hypothermia (uncontrollable shivering, confusion, clumsiness).
Switch to Plan B if: a student wants to turn back partway (a competent adult exits with them the way the group came, never continuing alone); forecast heavy rain threatens the trip window (the provider reschedules or offers a show cave alternative); a student is cold and needs to exit early (prioritise warmth over completing the planned route).
What a safe session looks like
- ✓ Every student’s helmet and headlamp is fitted and checked before entering the cave
- ✓ The group moves in single file at a pace set by the least confident member
- ✓ Headcounts happen at every significant junction or rest point
- ✓ A student who wants to turn back is accompanied out immediately, without argument
- ✓ The guide is actively monitoring water levels and conditions throughout
- ✓ Warm, dry clothing and hot drinks are available immediately on exit
7. Site Selection and Conditions
What makes a location suitable: an established, commercially operated cave system with experienced, appropriately qualified guides and a known safety record; a tour or trip option genuinely matched to your group’s age and experience.
Deal-breakers: any cave system without a professional operator and qualified guides; a provider unable to clearly describe the specific route, hazards, and turn-back options for your group’s chosen trip; recent heavy rain with no clear plan for how the operator assesses conditions.
Travel time and logistics: the main commercial caving regions (Waitomo, the West Coast) may involve a longer drive for some schools: factor this into a full-day or overnight itinerary rather than a simple day trip if your school isn’t nearby.
Toilets, shelter, water access: commercial operators typically have full facilities, changing rooms, and hot showers at their base: confirm this before booking, particularly for any trip involving wading or wetsuits.
“Plan B” locations: a show cave tour is the natural fallback for a group not suited to adventure caving, or if conditions rule out a wet-weather wild cave trip.
8. Session Structure Teachers Can Follow
This run-sheet works for a half-day adventure caving session: adjust timing for show cave tours or full days.
1. Arrival and set-up (20 minutes): headcount; wetsuit, helmet and headlamp fitting for every student.
2. Briefing (15–20 minutes): movement technique, headlamp use, group communication and the turn-back option explained clearly before entering the cave.
3. Entry and easy section (20–30 minutes): the group builds familiarity with cave movement and lighting on an easier opening section.
4. Main adventure section (60–90 minutes): guided movement through the trip’s central features (scrambling, wading, formations, glow-worms where present), with regular pauses to regroup and check in.
5. Exit (20–30 minutes): guided return to the surface, headcount confirmed on exit.
6. Warm-up and changing (20 minutes): hot showers/drinks and dry clothing, particularly important after any wading or wetsuit component.
7. Debrief (10–15 minutes): quick circle debrief (see How to Debrief Outdoor Experiences); guide highlights specific moments of courage; teacher connects to camp theme or curriculum focus (geology, biology of cave ecosystems, personal challenge).
9. Behaviour Management
For strategies on managing risk-takers, refusers, disengaged students, and creating positive reinforcement outdoors, see Behaviour Management Outdoors. Caving in particular needs an early, clear line on students who try to move ahead of the guide or touch cave formations: both are treated as immediate safety and conservation issues.
10. Reflection and Debrief
For debrief frameworks, facilitation tips, curriculum links, and reflection techniques, see How to Debrief Outdoor Experiences.
11. Common Issues and Fixes
Fear and reluctance
- Issue: a student is frightened of the dark or confined spaces before or during entry. Fix: never force participation; offer the show cave alternative, let them stay near the guide, or have a competent adult walk them back out. Being honest about feeling scared and choosing to exit is framed as a completely reasonable choice.
- Issue: a student freezes on a tight or awkward section. Fix: the guide talks them through slowly, one movement at a time, with the group waiting calmly rather than pressuring them to hurry.
Pacing issues
- Issue: the group’s pace varies widely between confident and hesitant students. Fix: the guide sets pace to the least confident member: this is non-negotiable in a cave environment, unlike some other activities.
- Issue: a student gets cold during a longer wading section. Fix: exit early with a competent adult rather than pushing through: warm dry clothing takes priority over completing the planned route.
Equipment and technique
- Issue: a headlamp fails or dims mid-trip. Fix: the guide has spares; the student stays adjacent to another light source until it’s replaced.
- Issue: a wetsuit doesn’t fit well. Fix: address it before entering the cave: an ill-fitting wetsuit affects both comfort and cold tolerance during the trip.
Group management
- Issue: students are touching formations or moving off the marked route out of curiosity. Fix: an immediate, clear reminder of conservation rules and why they matter (formations can take thousands of years to form and are easily and permanently damaged).
12. Activity Variations and Extensions
Easier version (confidence-building): a show cave tour only, with formed paths, constant lighting, and no wading or scrambling.
Standard version: a guided adventure cave trip with moderate scrambling and wading, matched to group confidence.
Challenge version: an extended adventure caving trip with more technical sections, an underground abseil component, or a black-water tubing element for well-prepared senior students with a specialist provider.
13. Cost and Resourcing Notes
What tends to drive cost:
| Cost driver | Typical range |
|---|---|
| Show cave guided tour | $25–$45 per student |
| Half-day adventure caving trip | $90–$150 per student |
| Full-day adventure caving (with abseil/black-water component) | $150–$250 per student |
| Transport to venue | $200–$600 per day depending on distance |
Ways to keep it affordable: choosing a show cave tour for younger or larger groups rather than the more expensive adventure option; combining a caving trip with another activity at the same regional stop to spread transport costs; booking well ahead, since commercial operators often have tiered group pricing.
Estimated total costs per student: $30–$50 for a show cave day visit; $100–$180 for a half-day adventure caving trip including transport contribution.
14. Next Steps for Schools
Ready to bring caving to your students? Here’s your checklist:
- Check readiness: review this guide and confirm your group’s age and experience suit a show cave or adventure caving trip.
- Confirm venue and provider: book with an established commercial caving operator well ahead of your date: popular sites like Waitomo book out during peak school camp season.
- Brief parents: use the template in Parent Communication for Land-Based Activities, specifically addressing fear-of-the-dark and confined-space concerns.
- Book a provider: contact operators 6–12 weeks ahead of camp dates. Use the questions in Working with Outdoor Education Providers to assess suitability, particularly around guide qualifications and conditions-based cancellation policy.
- Prepare students: a short, honest classroom conversation about what to expect (darkness, confined spaces, possible wading, the option to choose a show cave instead) reduces first-time anxiety significantly.
Leave a Reply
You must be logged in to post a comment.