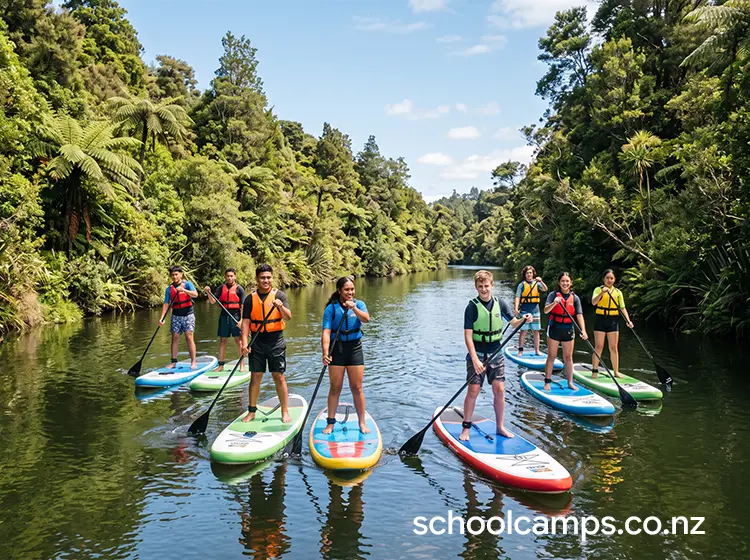
 This beginner-friendly guide covers activity-specific elements of SUP journey paddling. For broader topics that apply across all water activities, see our standalone reference guides:
- Working with Outdoor Education Providers
- Parent Communication for Water Activities
- Student Preparation for Water Activities
- Behaviour Management Outdoors
- How to Debrief Outdoor Experiences
- Water Safety Foundations
New to SUP? See Stand-Up Paddleboarding (Flatwater) for the skills-focused version of this activity.
1. Quick Overview
A SUP journey or distance paddle involves students paddling from one point to another on calm, sheltered water using paddleboards. Unlike skill-based SUP sessions that focus on technical drills, a journey paddle emphasises exploration, sustained effort, and navigation. Students travel along a shoreline, across a bay, or to a specific landmark: experiencing the water environment while building endurance and confidence on the board.
This activity works well in harbours, estuaries, coastal bays, or calm sections of lakes and rivers. It combines low-impact physical activity with the opportunity to observe marine or freshwater ecosystems, discuss navigation, and work together as a group moving through the natural environment. It appeals to schools because it builds confidence and self-belief as students navigate real water environments and manage their own boards over distance, develops teamwork and communication, and strengthens resilience through sustained physical effort and adapting to changing conditions.
Typical duration options
- Taster session (1–1.5 hours): a short paddle to build basic skills and confidence, suitable for first-time paddlers.
- Half-day session (2–3 hours): a skill warm-up, a journey paddle of 2–4km, and a debrief.
- Full-day session (4–6 hours): an extended journey with breaks, snack stops, and opportunities for exploration or environmental education.
2. Learning Outcomes Teachers Can Actually Use
Personal skills: building confidence through successfully navigating a physical challenge in an unfamiliar environment; managing nerves and uncertainty; demonstrating persistence and self-regulation when tired or when progress feels slow; developing a positive relationship with challenge and discomfort.
Social skills: communicating clearly and effectively on the water; offering encouragement to peers who are struggling or feeling nervous; practising tuakana-teina relationships; showing leadership by setting pace, checking in on others, or helping with group navigation.
Outdoor skills: developing efficient paddling technique, balance, and core strength; understanding gear use and care, including board handling and leash attachment; reading water conditions such as wind direction, currents, waves, and tide movement; learning to navigate using landmarks and simple route planning.
Thinking skills: making real-time decisions about paddling technique, route choice, and rest breaks; problem-solving when faced with wind, fatigue, or unexpected obstacles; developing situational awareness; evaluating personal capacity and knowing when to ask for support.
Wellbeing: building mana through accomplishment in a meaningful physical challenge; practising self-regulation through pacing and breath control; engaging in positive risk-taking; experiencing the mental health benefits of being on water and in nature.
3. Best Year Levels and Group Sizes
Suggested year levels
- Year 5–6: shorter distances (1–2km), calm enclosed waters, high supervision ratios. Focus on fun, confidence, and basic technique.
- Year 7–8: moderate distances (2–3km), slightly more exposed conditions if appropriate. Introduce navigation concepts and group awareness.
- Year 9–10: longer journeys (3–5km), greater independence, more complex route planning.
- Year 11–13: extended distances (5–8km+), leadership roles, advanced navigation, and the option to incorporate environmental or cultural studies into the journey.
Group size guidance
- Whole class sessions: work well with sufficient instructors or support boats (e.g. 30 students with 3–4 instructors plus safety craft).
- Small rotations (8–12 students): ideal for close supervision, skill development, and managing nervous or inexperienced paddlers.
- Teacher-led sessions: smaller groups (10–15) are more manageable unless teachers have strong paddling and safety skills.
Ratios and supervision
- Recommended ratio: 1 qualified instructor per 8–12 students, depending on conditions, ability, and journey distance.
- Teacher roles: monitor group dynamics, support behaviour management, stay close to nervous students, assist with gear and logistics.
- Provider roles: lead technical instruction, navigate routes, make weather and safety calls, manage rescue and emergency procedures.
- Safety craft: a support boat (kayak, RIB, or safety SUP) should accompany groups in open or exposed water.
4. Working with Providers
Deciding whether to run teacher-led or provider-led sessions, questions to ask providers, and what teachers should still do when working with external instructors:
See: Working with Outdoor Education Providers: for a journey paddle, confirm specifically whether a support/safety craft accompanies the group, since this matters more for distance paddles in open water than for skills-based sessions close to shore.
5. Planning Checklist
Permissions and communications
For parent letter templates, consent requirements, and addressing common parent concerns, see Parent Communication for Water Activities.
Skills and fitness preparation
For pre-camp fitness activities, skill practices, and confidence-building exercises, see Student Preparation for Water Activities.
Gear and clothing
What’s typically provided: paddleboards (inflatable or rigid), adjustable paddles, leashes, and PFDs if required by conditions or student ability.
What students bring: swimwear and a wetsuit or rash vest depending on water temperature; water shoes, sandals with straps, or old sneakers; hat, sunglasses with a retainer strap, and sunscreen; a water bottle; towel and complete change of warm dry clothes.
Cold/wet management: rash vests under wetsuits in cooler months; always bring a full set of dry clothes including undergarments and warm layers; closed-toe water shoes prevent cuts and provide grip; ensure a warm, dry area is available immediately after the session.
Accessibility and inclusion
Confidence: allow nervous students to paddle in pairs, stay close to shore, or have an instructor paddle alongside them.
Neurodiversity: provide clear, simple instructions; reduce sensory overload by avoiding crowded start areas; offer predictable routines.
Physical needs: use wider, more stable boards for students with balance or mobility challenges; consider sit-on-top kayaks as an alternative. Non-swimmers require PFDs and should stay in very shallow water or be paired with strong swimmers.
Keeping everyone involved: assign roles (navigator, pace-setter, safety spotter, encourager); rotate leadership through sections of the journey; pair stronger paddlers with those who need support; celebrate effort and persistence, not just speed or distance.
6. Safety, Risk, and Good Practice
Hazards to think about: drowning risk, particularly for non-swimmers or students who panic after falling in; cold water immersion leading to hypothermia; fatigue causing poor decision-making or inability to return safely; wind and currents pushing students off course or away from the group; sun exposure, dehydration, and heat exhaustion; marine traffic (boats, jet skis) in shared waterways; collision with other paddlers, submerged objects, or rocky shoreline; injury from paddles.
Key controls: a briefing covering signals, boundaries, what to do if you fall in, and how to stay together; a defined route with turn-around points and areas to avoid; a buddy system with regular checks; whistles, hand signals, and verbal check-ins; weather monitoring before departure and throughout; PFDs for non-swimmers, wetsuits in cold water, leashes to prevent board separation; a support craft (safety boat or experienced paddler) following the group.
Roles on the day: the lead instructor or qualified teacher makes the final call on continuing, altering the route, or ending the session; at least one staff member carries a waterproof first aid kit and communication device (VHF radio or mobile phone in a waterproof case), with emergency contact details and medical information accessible.
When to stop or switch plans (red flags)
- Wind speed exceeding 15 knots or forecast to increase significantly
- Swell or wave height making it difficult for students to maintain balance
- Thunderstorms, lightning, or heavy rain reducing visibility or safety
- Water temperature below 15°C without appropriate thermal protection
- Students showing signs of hypothermia, exhaustion, or distress
- The group becoming separated or unable to maintain visual contact
- Marine traffic creating unsafe conditions
- Any injury or medical incident requiring immediate attention
What a safe session looks like
- ✓ All students can be seen and counted at regular intervals
- ✓ The group stays within designated boundaries and maintains reasonable proximity
- ✓ Students follow instructions promptly and communicate clearly
- ✓ Weather and water conditions remain stable and manageable
- ✓ Instructors and teachers are calm, alert, and in control
- ✓ Everyone is warm, hydrated, and showing positive energy levels
Minimum skill progressions: kneeling before standing, standing transition in calm shallow water, consistent forward paddling technique, turning with sweep strokes, and the ability to climb back onto the board after falling in.
7. Site Selection and Conditions
What makes a location suitable: sheltered water with minimal wind exposure and wave action (harbours, estuaries, bays, calm lakes); clear boundaries using visible shoreline or landmarks; minimal marine traffic; manageable currents (gentle or slack tide for beginner groups); safe entry and exit points; scenic or educational features that enhance the experience.
Travel time and logistics: choose venues within reasonable travel distance (ideally under 1 hour); consider parking and unloading access; confirm the site permits SUP use and whether permits or fees are required.
Toilets, shelter, water access: toilets essential for longer sessions; shelter (building, pavilion, or vehicle) for changing and warming up; drinking water available or brought in bulk.
“Plan B” locations: a more sheltered backup location in case the primary site is too exposed; an indoor or land-based activity ready if water conditions are unsafe; shorter route options that keep students close to shore and within easy recall.
Best venue types in New Zealand: sheltered coastal bays (Okahu Bay, Charteris Bay); estuaries and harbours (Tauranga Harbour, Akaroa Harbour); lakes (Lake Taupō, Lake Wanaka); slow-moving rivers (Whanganui River calm sections).
8. Session Structure Teachers Can Follow
1. Arrival and set-up (10–15 minutes): headcount; boundaries pointed out (launch area, paddling zone, return point); gear distributed and checked (boards, paddles, leashes, wetsuit fit, PFDs); toilet and water break.
2. Briefing (10 minutes): expectations (listen to instructions, stay with your buddy, respect others’ space); signals and commands (one whistle = attention, three = return immediately); buddy system assigned; what to do if you fall in; route overview shown on a map or by pointing out landmarks.
3. Warm-up (10–15 minutes): land-based stretches; on-water practice paddling in a small circle close to shore, practising kneeling and standing; re-group and check everyone is comfortable.
4. Skill build (15–20 minutes): forward paddling (reach, pull, rotation); turning (sweep strokes and pivot turns); stopping (reverse paddle or dragging the blade); simple progression from kneeling to standing once confident.
5. Main challenge: the journey (30–90 minutes depending on session length): set off as a group with the lead instructor at the front and support staff at the rear; maintain visual contact with all students; regular headcounts and buddy checks every 10–15 minutes; rotate leaders for short sections; rest breaks at a beach or calm area; environmental observations along the route.
6. Cool-down and pack out (10–15 minutes): return to the launch site and come ashore safely; gentle stretches; rinse and stack boards, secure paddles and leashes; change into dry clothes immediately.
7. Final headcount and debrief (10 minutes): confirm everyone is accounted for; quick debrief (see How to Debrief Outdoor Experiences); acknowledge effort, teamwork, and individual achievements.
9. Behaviour Management
For strategies on managing risk-takers, refusers, disengaged students, and creating positive reinforcement outdoors, see Behaviour Management Outdoors.
10. Reflection and Debrief
For debrief frameworks, facilitation tips, curriculum links, and reflection techniques, see How to Debrief Outdoor Experiences.
11. Common Issues and Fixes
Weather changes
Issue: wind picks up or rain begins mid-session. Fix: call the group together immediately and assess conditions. Shorten the route, turn back early, or head to more sheltered water. If conditions worsen quickly, end the session and return to shore, keeping students warm and dry afterward.
Fear, tears, or panic
Issue: a student becomes upset, frightened, or refuses to continue. Fix: stay calm and reassuring, bring them close to shore or a support boat, offer simple choices (sit down on the board, kneel instead of standing, or be towed back), pair them with a calm supportive peer or instructor.
Gear problems
Issue: a board loses air, a paddle breaks, or a leash comes off. Fix: carry a pump, spare paddle, and extra leashes. If a board deflates significantly, bring the student ashore or onto a support craft.
Group bottlenecks
Issue: students lose interest or get cold while waiting to launch or during breaks. Fix: launch in small waves of 3–5 students, keep warm-up activities brief, and plan rest breaks strategically in warm, sheltered spots.
Energy crashes and dehydration
Issue: students become fatigued, dehydrated, or lose motivation. Fix: build in regular water breaks, especially on warm days, bring snacks for half-day or full-day sessions, and watch for signs of fatigue.
12. Activity Variations and Extensions
Easier version (confidence-building): a very short route (500m–1km) in extremely sheltered water; paddling on knees permitted; frequent stops for reassurance and rest; tandem paddling (two students per board) for those who need extra support.
Standard version: a 2–4km journey in calm to moderate conditions; standing paddle encouraged for most students; introduction to navigation using landmarks; focus on technique, teamwork, and environmental awareness.
Challenge version: a 5–8km+ journey with more exposed water or tidal movement; student-led navigation with map and compass or GPS; time goals or pace challenges; leadership rotation through different sections; extra responsibilities such as environmental monitoring or photography.
13. Cost and Resourcing Notes
What tends to drive cost:
| Cost driver | Notes |
|---|---|
| Qualified instructors | The largest single expense: experienced SUP instructors |
| Equipment hire | Boards, paddles, leashes, and wetsuits for a full class |
| Transport | Moving students and gear to the venue, especially if not local |
| Site access fees | Some venues charge for use, parking, or permits |
| Safety support | Support boats, radios, and safety gear: more important here than for skills-based SUP given the distances involved |
Ways to keep it affordable: rotation stations running smaller groups through multiple sessions to share equipment; shared gear with other schools or community groups; shorter taster sessions or half-days rather than full-day journeys; local venues to reduce transport costs; teacher-led sessions where staff are qualified; bulk bookings negotiated across multiple classes or year levels.
14. Next Steps for Schools
- Check readiness: review your teachers’ qualifications, equipment access, and school policies around water-based activities.
- Confirm venue: identify and visit suitable locations within reasonable travel distance.
- Brief parents: use Parent Communication for Water Activities to send information on the activity, risks, clothing requirements, and wet-weather plans.
- Book a provider (if used): contact reputable providers, confirm dates and ratios, and use the questions in Working with Outdoor Education Providers: checking specifically on support/safety craft arrangements for the distance involved.
- Run a pre-camp skills session: use Student Preparation for Water Activities, and where possible do a short taster or pool-based session first to identify students who need extra support before the full journey.
Key Safety Standards and Guidelines
- Water Safety New Zealand (WSNZ): watersafety.org.nz
- Education Outdoors New Zealand (EONZ): eonz.org.nz
- Maritime NZ: maritimenz.govt.nz
- Paddle NZ: paddlenz.org.nz
Leave a Reply
You must be logged in to post a comment.