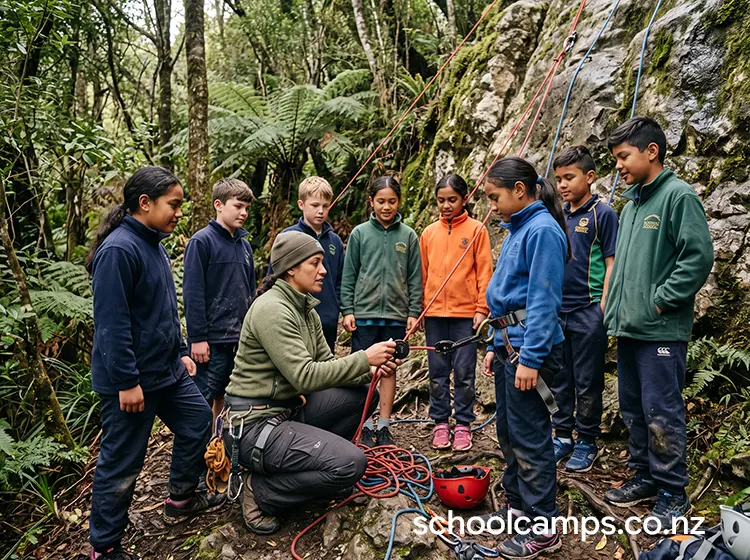
 This guide covers activity-specific elements of abseiling. For broader topics that apply across land-based activities, see our standalone reference guides:
- Working with Outdoor Education Providers
- Parent Communication for Land-Based Activities
- Student Preparation for Land-Based Activities
- Behaviour Management Outdoors
- How to Debrief Outdoor Experiences
- Land and Bush Safety Foundations
1. Quick Overview
Abseiling (controlled descent down a rock face or purpose-built tower on a fixed rope, managed by a qualified instructor belaying from above or below) is typically offered either at a dedicated outdoor centre (often on a purpose-built tower or bluff) or as part of a broader climbing or canyoning programme at a natural site. Unlike rock climbing, students aren’t climbing under their own strength; the core skill is trusting the system and controlling their own rate of descent with the rope.
Schools choose it because it delivers a fast, highly visible confidence challenge in a short session, needs relatively little instruction time to reach a genuine “moment” for each student, and works well as a single station within a broader activity day or camp programme.
Typical duration options
- Taster session (45–60 minutes): safety briefing and harness fitting, then two to three descents each on an easier pitch. Good as one station in a rotation day.
- Half-day session (2–3 hours): full instruction on abseiling technique and communication, multiple descents with increasing pitch length or difficulty, structured debrief.
- Full-day session (4–6 hours): extended sessions potentially combining abseiling with rock climbing or, at a natural site, an introduction to a longer multi-pitch descent for older, well-prepared students.
2. Learning Outcomes Teachers Can Actually Use
Personal skills: builds confidence through a controlled but genuinely challenging physical and mental task; manages fear of heights and of “leaning back into nothing” in a supported, voluntary way; practises trusting a safety system and an instructor rather than only their own physical strength; demonstrates persistence in choosing to descend despite initial nerves.
Social skills: offers specific encouragement to a nervous peer waiting their turn; builds trust in the instructor and safety system, often discussed openly with peers beforehand; takes turns and manages queuing patiently.
Outdoor/technical skills: understands and correctly uses safety equipment (harness, descender device, helmet); learns basic communication commands used during a controlled descent; develops body positioning and rope-control technique.
Thinking skills: makes a genuine decision under mild stress (stepping backward off an edge); regulates pace and control during descent rather than either freezing or descending too fast; assesses personal comfort level honestly and communicates it to the instructor.
Wellbeing: experiences a specific, memorable form of achievement tied to overcoming an initial fear response; builds a healthier relationship with controlled risk and trust in safety systems; frequently cited by students as a standout camp moment given how quickly it moves from nervous anticipation to genuine pride.
3. Best Year Levels and Group Sizes
Suggested year levels
- Year 4–6: shorter, lower pitches on a purpose-built tower with maximum instructor reassurance and no pressure to go higher than comfortable.
- Year 7–8: standard tower or bluff pitches with full technique instruction and simple peer-support roles (encouragement, helping with harness checks under supervision).
- Year 9–13: longer or natural-site pitches, and (where a provider supports it) an introduction to setting up a personal abseil system as a skill-building step for those continuing into climbing or mountaineering pathways.
Group size guidance
- Whole class (25–30 students): works well as a rotation station, since only one or two students can descend at a time regardless of group size: pair with a second activity to keep everyone engaged while waiting.
- Small groups (8–12 students): ideal for a dedicated abseiling session with good instructor attention and shorter queue times.
- Very large groups (60+): only feasible with multiple pitches/stations or a staggered rotation through the day.
Ratios and supervision
As a general guide: 1:8–1:10 at a purpose-built tower with a straightforward, well-controlled system and instructors experienced in managing groups efficiently; tightening to 1:4–1:6 at a natural rock site, where each pitch needs closer, more individualised oversight. Every session must be run by an instructor holding a current NZOIA qualification covering abseiling for the specific venue type (tower, rock, or cave, depending on setting).
4. Working with Providers
Deciding whether to run teacher-led or provider-led sessions, questions to ask providers, and what teachers should still do when working with external instructors:
See: Working with Outdoor Education Providers
Abseiling is essentially always provider-led: schools do not set up or supervise this activity independently. Confirm the instructor holds a current NZOIA qualification appropriate to the specific venue, and ask how the system is set up and double-checked before any student descends.
5. Planning Checklist
Permissions and communications
For parent letter templates, consent requirements, and addressing common parent concerns, see Parent Communication for Land-Based Activities. Fear of heights is a common and specific concern worth addressing directly: make clear that stopping or being lowered is always an option once a student is on the rope.
Skills and fitness preparation
For general pre-camp confidence-building, see Student Preparation for Land-Based Activities. No specific fitness preparation is required; a brief classroom conversation normalising nerves about the activity does more for participation than any physical preparation.
Gear and clothing
What’s provided (typical provider/venue setup): harness, helmet, descender device and rope system.
What students bring: closefitting sports clothing that allows free movement (no loose or baggy clothing that can catch on gear); hair tied back; enclosed shoes; a water bottle.
Weather management (outdoor/natural venues only): wet rock significantly increases risk and reduces friction, so have an indoor or tower-based backup plan for any natural-site session affected by rain.
Accessibility and inclusion
Confidence levels: let nervous students start on the shortest, easiest pitch and choose to stop or be lowered at any point; offer roles like harness-check assistant (under direct supervision) for students who want to be involved without descending themselves; celebrate any attempt, including simply stepping to the edge.
Neurodiversity: provide clear, step-by-step visual demonstrations of harness fitting and safety checks; use consistent verbal commands throughout descent; allow noise-reducing headphones during busy briefing periods; consider one-on-one instruction time for students who struggle with group demonstrations.
Physical needs: consult providers in advance about specific adaptive equipment or techniques, since many venues can accommodate a range of physical needs with advance notice.
Keeping everyone involved: rotate roles (harness-check assistant, encourager, queue helper); create a genuine but achievable extension for confident students (a longer or slightly more technical pitch where available); celebrate effort and personal growth over speed or how many descents someone completed.
6. Safety, Risk, and Good Practice
Hazards to think about: falls (managed by the rope and descender system, but equipment or human error can still cause harm); equipment failure (worn ropes, damaged harnesses, an incorrectly rigged descender); instructor or belayer error; rockfall or loose material at natural sites; collisions between students queuing near the edge; overexertion or dropped rope-control late in a session.
Key controls: a comprehensive briefing covering harness fitting, safety commands, and the system before anyone approaches the edge; every rope system set up and checked by a qualified instructor; a strict buddy-check or instructor-check before every descent, without exception; a controlled, single-student-at-a-time approach to the edge; a designated safe waiting area well back from the descent point.
Roles on the day: a designated decision-maker (lead instructor) with final authority on which pitches are open and when to pause the session; a qualified belayer or descent controller assigned to every active rope; a first aid carrier with a comprehensive kit; a queue manager keeping the group organised and safely back from the edge while waiting.
When to stop or switch plans (red flags)
Stop immediately if: any equipment fault is identified (frayed rope, damaged harness, a descender not rigged correctly); an instructor or belayer is uncertain or shows poor technique during a system check; weather turns at a natural site (rain makes rock significantly more dangerous); a student is not properly clipped in or the check step is skipped; any student is at the edge without direct instructor oversight.
Switch to Plan B if: conditions are marginal at an outdoor site (move to an indoor/tower option or reschedule); a student is scared at the edge (they step back and try again later, or choose not to continue: never rushed or coaxed); queues are getting long (add a second, non-abseiling station to rotate through while waiting).
What a safe session looks like
- ✓ Every harness is fitted and checked by an instructor before the first descent
- ✓ A system check happens before every single descent, without exception
- ✓ Only one student is at the edge or descending at a time per rope
- ✓ Students use and respond correctly to standard abseiling commands
- ✓ Nervous students are supported to stop or step back at their own comfort level, never pushed further
- ✓ Equipment has been visually checked at the start of the session and after any unusual event
7. Site Selection and Conditions
What makes a location suitable: for a purpose-built tower, a venue with current safety certification, qualified staff, and an efficient system for managing group throughput; for a natural site, solid rock with an established, safely anchored system and easy, controlled access to the top and bottom.
Deal-breakers: any natural venue with loose or crumbling rock at the anchor or descent line; a venue that can’t demonstrate current safety inspections or staff qualifications; poor access or waiting arrangements that put students near the edge unsupervised.
Travel time and logistics: purpose-built towers are often close to town and simple to book; natural sites need extra time for approach and setup: factor in at least an hour either side of the activity itself.
Toilets, shelter, water access: purpose-built venues typically have full facilities; natural sites need a plan for toilets, shade, and drinking water near the base.
“Plan B” locations: a purpose-built abseiling tower is the standard backup for any natural-site session affected by weather.
8. Session Structure Teachers Can Follow
This run-sheet works for a half-day session: adjust timing for tasters or full days.
1. Arrival and set-up (15 minutes): headcount; venue orientation; instructor sets up or checks the rope systems.
2. Briefing (15–20 minutes): harness fitting for every student, checked individually; safety commands taught and practised; the system explained and demonstrated from the top and bottom.
3. First descent (a short, easy pitch): every student completes one easy descent to build familiarity with the harness and system before attempting anything longer or more difficult.
4. Main descents (30–60 minutes): students complete further descents, with instructor feedback on technique and pacing; queue managed with a second activity if wait times build up.
5. Cool-down and pack out (10–15 minutes): harnesses and gear returned and checked in.
6. Debrief (10–15 minutes): quick circle debrief (see How to Debrief Outdoor Experiences); instructor highlights specific moments of courage and growth; teacher connects to camp theme or curriculum focus.
9. Behaviour Management
For strategies on managing risk-takers, refusers, disengaged students, and creating positive reinforcement outdoors, see Behaviour Management Outdoors.
10. Reflection and Debrief
For debrief frameworks, facilitation tips, curriculum links, and reflection techniques, see How to Debrief Outdoor Experiences.
11. Common Issues and Fixes
Fear and reluctance
Issue: a student won’t step back off the edge. Fix: never force it; let them watch others first, try leaning back while still holding the top with instructor support, or simply choose not to continue. Celebrate any attempt, however small.
Issue: a student freezes partway down. Fix: the instructor calmly talks them through options (rest on the rope, continue slowly, or be lowered): being lowered is always framed as a completely fine choice, never a failure.
Queue and pacing issues
Issue: long queues form at a single pitch. Fix: set up a second activity for students waiting their turn, and rotate groups through in an organised order agreed in advance.
Issue: students descend at very different rates. Fix: build in extra descents for faster, more confident students rather than rushing nervous ones.
Equipment and technique
Issue: a student’s harness feels wrong mid-descent. Fix: they signal to be lowered or brought to a stop, the harness is refitted on the ground, and they try again if they choose to: never adjust a harness mid-descent.
Issue: a student descends too fast, gripping the rope incorrectly. Fix: the instructor talks them through correct hand position and pace immediately: this is a safety correction, not just a technique tip.
Group management
Issue: students are distracting the instructor or belayer with noise near the edge. Fix: immediate, calm reminder that the area near the edge requires full attention: repeat breaches mean that student waits further back for the remainder of the session.
12. Activity Variations and Extensions
Easier version (confidence-building): a single short, low pitch on a purpose-built tower with maximum instructor reassurance; a “just lean back and try” goal for the most nervous students, framed as a genuine success.
Standard version: multiple descents of increasing pitch length on a tower or accessible natural site, with instructor feedback on technique.
Challenge version: longer or more technical natural-site pitches for experienced or confident students; combining abseiling with a rock climbing session at the same venue; for older students, a pathway toward broader NZOIA-aligned rope skills if the school wants to build ongoing capability.
13. Cost and Resourcing Notes
What tends to drive cost:
| Cost driver | Typical range |
|---|---|
| Qualified instructor | $400–$700 per instructor per day |
| Tower/venue hire and equipment | $15–$30 per student for a half-day session |
| Harness and helmet hire (if not included) | $5–$10 per student |
| Transport to venue | $200–$500 per day if more than 30 minutes from school |
Ways to keep it affordable: running abseiling as one rotation station among several to reduce per-student instructor time; booking a local tower’s own group programme rather than a specialist natural-site provider; grouping multiple classes into one booked session to spread fixed venue costs.
Estimated total costs per student: tower-based session with venue instructors, $25–$45 per student for a half-day session; natural-site session with a specialist provider, $50–$90 per student depending on group size and travel.
14. Next Steps for Schools
Ready to bring abseiling to your students? Here’s your checklist:
- Check readiness: review this guide and confirm your group size and available budget suit a tower-based or natural-site session.
- Confirm venue: book a tower or natural site with current safety certification and enough capacity for your group size.
- Brief parents: use the template in Parent Communication for Land-Based Activities, particularly addressing fear-of-heights concerns.
- Book a provider: contact providers or venues 6–12 weeks ahead of camp dates. Use the questions in Working with Outdoor Education Providers to assess suitability.
- Run a pre-camp confidence conversation: normalising nerves about heights and reinforcing that stopping or being lowered is always an option pays off directly in participation on the day.
Leave a Reply
You must be logged in to post a comment.