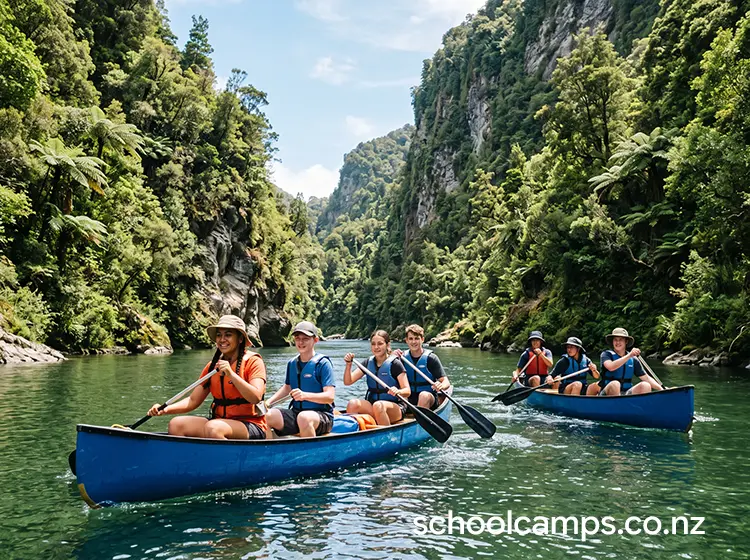
 This guide covers activity-specific elements of canoeing. For broader topics that apply across all water activities, see our standalone reference guides:
- Working with Outdoor Education Providers
- Parent Communication for Water Activities
- Student Preparation for Water Activities
- Behaviour Management Outdoors
- How to Debrief Outdoor Experiences
- Water Safety Foundations
1. Quick Overview
Flatwater canoeing is an accessible, versatile outdoor activity where students learn to paddle open canoes on calm lakes, slow-flowing rivers, or sheltered coastal waters. Unlike kayaking, canoes are open-topped, typically paddled from a kneeling or seated position using single-bladed paddles. Students usually work in pairs or groups of three, developing coordination, communication, and water confidence in a stable, forgiving craft.
Schools choose canoeing because it offers immediate engagement with the natural environment while building core outdoor skills without requiring high fitness levels or prior experience. It’s particularly effective for developing teamwork: partners must synchronise their paddling, navigate together, and solve problems collaboratively. The slower pace compared to kayaking allows for environmental observation, conversations about place and ecology, and meaningful reflection during the activity itself. Canoes can carry gear for longer expeditions, making them ideal for progression from short taster sessions through to multi-day journeys as students advance.
Typical duration options
- Taster session (1–1.5 hours): basic paddle strokes, straight-line paddling, simple turning, short exploration of the immediate area: ideal for Year 4–6 students or as an introductory rotation during camp
- Half-day session (2.5–3 hours): skill development, short journey (1–3km), games or challenges, and time for environmental observation and reflection
- Full-day session (5–6 hours): extended journey (5–8km), lunch stop on shore, leadership rotations, navigation practice, deeper connection to waterways and local ecology
2. Learning Outcomes Teachers Can Actually Use
The following outcomes are grouped by skill area and written in plain language that connects directly to curriculum competencies and observable student behaviours.
Personal skills: building confidence in an unfamiliar environment, managing initial apprehension about water or tipping; developing physical persistence: paddling requires sustained effort and students learn to pace themselves; self-regulation when frustration arises (e.g. canoe going in circles, getting wet, paddling against wind); recognising personal strengths and contribution: some students excel at steering, others at power strokes or staying calm.
Social skills: clear, constructive communication with a partner under pressure (“paddle left” vs shouting or blaming); offering and receiving encouragement, especially when partners have different confidence or skill levels; leadership through informal roles: bow paddler navigates, stern paddler steers, both must coordinate; tuakana-teina relationships as experienced paddlers support beginners within and across canoes.
Outdoor skills: fundamental movement skills: coordinating upper body rotation, blade placement, stroke timing; gear awareness and care: carrying canoes safely, securing loose items, respecting equipment; reading water conditions: identifying wind direction, current, shallow areas, safe landing zones; basic rescue and safety responses: staying with canoe if capsized, signalling for help, assisting others.
Thinking skills: decision-making about route choices: shortest path vs avoiding obstacles, when to rest; problem-solving in real time: canoe drifting off course, paddle technique not working, gear shifting inside boat; situational awareness: monitoring group position, weather changes, partner fatigue, distance from shore.
Wellbeing: enhancing mana through mastering a new skill and contributing meaningfully to partner and group success; experiencing positive risk-taking in a controlled environment: acceptable discomfort that builds resilience; connection to place: slowing down to notice birdlife, water quality, shoreline features, local ecology and cultural significance.
3. Best Year Levels and Group Sizes
Suggested year levels
- Year 4–6: shorter sessions (1–2 hours), very sheltered water, focus on fun and basic skills. Tandem canoes with adult or Year 7–8 buddy in third seat if needed for confidence. Keep routes simple and close to shore.
- Year 7–8: half-day or full-day sessions work well. Students can paddle independently in pairs with appropriate supervision. Introduce basic navigation, leadership rotations, and environmental observation tasks.
- Year 9–13: full-day or multi-day capable. Can handle longer distances (8–12km), more exposed conditions (within flatwater parameters), leadership challenges, and overnight expeditions with appropriate progression.
Group size guidance
- Whole class rotations: 15–20 students maximum per session on water (7–10 canoes). Larger classes should split into rotations with other activities running concurrently.
- Small group sessions: 8–12 students (4–6 canoes) allows for tighter supervision, more individualised feedback, and better management of nervous or high-needs students.
Ratios and supervision
- Provider-led: typically 1 qualified instructor per 8–10 students on calm water, 1:6 for less experienced groups or more challenging conditions. Provider should have at least one instructor on the water in a support canoe or kayak.
- Teacher-led: minimum 1 qualified adult per 6 students, with at least two adults total (one should be rescue-capable and in a support craft). Teachers must hold appropriate water safety and paddling qualifications.
- Teacher role when provider is leading: teachers remain responsible for overall student welfare, behaviour management, medical response, and learning integration. Teachers should know the route plan, have emergency communications, and maintain visual contact with their students.
4. Working with Providers
Deciding whether to run teacher-led or provider-led sessions, questions to ask providers, and what teachers should still do when working with external instructors:
See: Working with Outdoor Education Providers
5. Planning Checklist
Permissions and communications
For parent letter templates, consent requirements, and addressing common parent concerns, see Parent Communication for Water Activities.
Skills and fitness preparation
For pre-camp fitness activities, skill practices, and confidence-building exercises, see Student Preparation for Water Activities.
Gear and clothing
What’s provided vs what students bring. Provider typically supplies canoes, paddles, PFDs (personal flotation devices), safety/rescue equipment, and dry bags for group gear. Students bring personal clothing, water bottle, sunscreen, hat, towel, complete dry change in waterproof bag, and snacks (if half/full day).
Cold/wet management. Layering system: base layer (synthetic or merino, never cotton), insulating layer (fleece or polypropylene), windproof/waterproof outer if available. Footwear: enclosed shoes that can get wet (old sneakers, sandals with back strap, wetsuit booties): no jandals, unsafe for getting in/out of canoes. Sun protection: wide-brim hat or cap, sunglasses with retainer strap, high-SPF sunscreen (applied before session and reapplied). Spare clothes: complete change (underwear to outer layers) in a sealed dry bag or plastic bag: even if they don’t capsize, spray and rain can soak clothing.
Accessibility and inclusion
Confidence modifications: nervous students can start in a triple canoe with teacher/instructor, practice on shore first, or paddle tandem with a confident peer. Normalise getting wet: bring wetsuits if cold is a barrier.
Neurodiversity support: provide clear, step-by-step visual demonstrations. Use consistent verbal cues. Allow students to observe before participating. Offer noise-reducing headphones during loud briefings if needed.
Physical needs: wide-beam canoes offer more stability for students with balance challenges. Adapted paddles (shorter, lighter, T-grip modifications) available through some providers. Seated positions instead of kneeling reduces lower body strain.
Meaningful involvement: non-paddling roles include navigator (map reading), timekeeper, wildlife observer, photographer. Students unable to paddle can still be part of the journey and contribute valuable perspective.
6. Safety, Risk, and Good Practice
Safety in flatwater canoeing depends on recognising hazards, implementing sensible controls, and maintaining clear communication throughout the session.
Activity-specific hazards: capsize and immersion (even calm water can lead to tipping, especially with inexperienced paddlers or sudden movements); cold water shock and hypothermia (NZ water temperatures can be surprisingly cold year-round, even on warm days); wind and weather changes (sudden wind can push canoes off course, create waves, and make paddling extremely difficult for beginners); separation from group (canoes can drift apart quickly if not actively managed; students can feel isolated and panicked); entanglement or entrapment (submerged logs, weeds, or debris can catch paddles or even trap swimmers if capsized); sun exposure and dehydration (reflection off water intensifies UV exposure; students may not notice heat stress while focused on paddling); fatigue and muscle strain (repetitive paddling motion can cause shoulder, back, or wrist strain, especially in unconditioned students).
Key controls: comprehensive briefing covering capsize procedure, boundaries, and signals before launching; clear boundaries defined using landmarks (buoys, jetties, tree lines), re-stated on water if needed; buddy system where partners check each other’s PFDs and look out for each other’s wellbeing; regular headcounts: count canoes visually every 10–15 minutes using a roster system or coloured paddles; communication plan with whistle signals (one blast = attention, three blasts = emergency return) and waterproof two-way radios or phones in dry bags; weather monitoring before and during the session, with a clear protocol for calling students back if conditions deteriorate; proper protective equipment: correctly fitted PFDs meeting NZ safety standards, checked before each use.
Roles on the day: a designated decision-maker (lead instructor or trip leader) with final authority to modify or cancel the session; a person carrying first aid and emergency comms at all times; a support craft operator experienced in water rescue, when available.
When to stop or switch plans (red flags)
- Wind speed exceeds 20 km/h or creates whitecaps
- Lightning observed or thunder heard: evacuate water immediately
- Water temperature below 15°C without appropriate thermal protection
- Visibility drops below 100 metres due to fog or heavy rain
- Any student shows signs of hypothermia or heat exhaustion
- Group becomes separated beyond visual/whistle contact
- Multiple students expressing significant fear or distress that cannot be managed supportively
What a safe session looks like
- ✓ All students and adults wearing correctly fitted PFDs before approaching water
- ✓ A clear verbal briefing completed, with students able to repeat back key safety signals
- ✓ Boundaries visible and understood, with regular headcounts occurring
- ✓ Adults positioned strategically: at least one on shore, one on water in support craft if available
- ✓ Students demonstrating appropriate behaviour
- ✓ Weather conditions stable or improving, with the decision-maker actively monitoring
7. Site Selection and Conditions
What makes a location suitable: sheltered from prevailing wind (bays, coves, or lakes protected by hills or tree lines: avoid open coastlines or wide lake expanses); minimal current (slow-moving rivers of Grade 1 or flat, lakes with no significant flow: avoid tidal zones unless timed for slack water); safe entry/exit points (gently sloping shore, sandy or gravel beach, or stable jetty/pontoon); clear water with visible hazards (murky water increases entrapment risk if capsized); no motorised traffic, or clearly designated zones separating paddlers from powerboats; appropriate depth (minimum 1 metre to paddle, 1.5–2 metres ideal near shore for beginners to stand if needed).
Travel time and logistics: within 30–60 minutes travel from school for half-day sessions, up to 90 minutes for full-day experiences; access for bus or van parking near the launch site; allow a minimum of 20 minutes each end for loading/unloading equipment.
Toilets, shelter, water access: toilets within a 5-minute walk of the launch site, or a plan in place for remote locations; shelter for changing clothes or warming up; access to drinking water refills for half/full-day sessions.
“Plan B” locations or lower-risk alternatives: identify a more sheltered backup location; consider on-land alternatives (simulated paddling strokes, map reading and water safety theory, team-building activities); for schools with pools, basic canoe skills can be introduced in a controlled pool environment first.
Best venue types in New Zealand:
- Northland: Waitangi Estuary (slack tide), Lake Kai Iwi, Mangawhai Harbour (inner sections)
- Auckland: Okura Estuary, Lake Pupuke, Wairoa River (upper calm sections)
- Waikato: Lake Karapiro, Waikato River (specific calm stretches), Lake Rotoroa
- Bay of Plenty: Lake Rotorua (sheltered bays), Lake Rotoiti, McLaren Lake
- Hawke’s Bay: Lake Tūtira, Mohaka River (Grade 1 sections)
- Taranaki: Lake Rotokare, Lake Mangamahoe
- Manawatū-Whanganui: Whanganui River (designated calm sections), Lake Wiritoa
- Wellington: Pauatahanui Inlet (slack tide), Karori Reservoir (when open), Hutt River (lower sections)
- Tasman/Nelson: Lake Rotoroa, Nelson Haven (inner harbour), Marahau Estuary
- Canterbury: Lake Pearson, Lake Grassmere, Ashley River (calm sections)
- Otago: Lake Dunstan, Otago Harbour (upper reaches), Clutha River (specific Grade 1 stretches)
- Southland: Lake Manapouri (sheltered bays), Lake Te Anau (specific areas), Oreti River (calm pools)
8. Session Structure Teachers Can Follow
This run-sheet provides a repeatable framework for either teacher-led or provider-led sessions. Timing is approximate and should flex based on student needs and conditions.
1. Arrival and set-up (15–20 minutes): initial headcount as students exit vehicle; establish toileting plan and boundaries; unload gear efficiently with student helpers; distribute PFDs and ensure correct fit.
2. Briefing (10–15 minutes): safety expectations (PFDs stay on, stay with canoe if tipped, listen for whistle signals); signals and commands (one whistle = stop and look, three whistles = return to shore, raised paddle = need help); boundaries pointed out using physical landmarks; buddy system assigned or confirmed; capsize procedure demonstrated on shore.
3. Warm-up (5–10 minutes): shoulder rolls, arm circles, torso twists; practice paddle grip and basic stroke motion on land; discuss canoe entry (step in centre, low centre of gravity, one person stabilises while other enters).
4. Skill build (20–30 minutes): Stage 1; entering and exiting canoe safely, finding balance while stationary. Stage 2: forward paddling in a straight line for 20–30 metres. Stage 3: stopping using reverse strokes or drag paddle. Stage 4: basic turning using sweep strokes or draw strokes, navigating around a simple marker.
5. Main challenge (30–90 minutes depending on session length): choose one approach based on student level: rotation stations (precision paddling through markers, tandem race, rescue practice, distance challenge, rotating every 15 minutes); shared journey (group paddles together to a destination, explores, returns together); leadership challenge (pairs take turns leading the group to waypoints, appropriate for Year 7+).
6. Cool-down and pack out (15–20 minutes): final paddle to shore at a gentle pace; exit canoes safely and secure equipment; light stretching; students help carry canoes, rinse and organise gear, check for lost items.
7. Final headcount and debrief (10 minutes): confirm all students present before anyone changes or disperses; quick circle debrief (see How to Debrief Outdoor Experiences for detailed formats).
9. Behaviour Management
For strategies on managing risk-takers, refusers, disengaged students, and creating positive reinforcement outdoors, see Behaviour Management Outdoors.
10. Reflection and Debrief
For debrief frameworks, facilitation tips, curriculum links, and reflection techniques, see How to Debrief Outdoor Experiences.
11. Common Issues and Fixes
Weather changes
Issue: wind picks up mid-session, creating waves and making paddling difficult for beginners. Fix: use the three-whistle recall signal immediately and direct students to paddle toward the nearest shore with wind at their backs if possible. Once regrouped, assess: if wind is under 25 km/h and not worsening, move to a more sheltered area; if over 25 km/h or increasing, end the session early and transition to a land-based alternative.
Issue: unexpected rain arrives and students are getting cold. Fix: light rain alone isn’t dangerous: reassure students they can get wet. Monitor for shivering or complaints of cold. If rain is heavy or students show signs of cold stress, return to shore, provide dry clothes and warm drinks immediately, and watch for hypothermia signs.
Fear and tears
Issue: a student becomes very anxious once on the water and wants to go back immediately. Fix: stay calm and validate their feelings, bring their canoe alongside a support canoe, and offer graduated options (“Would you like to just sit here for two minutes and see how you feel?”). If they still want out, bring them to shore without judgment and provide a meaningful alternative role. Don’t force continued participation.
Issue: a student cries after capsizing, even though rescued quickly and safely. Fix: this is a normal emotional response to shock. Get them to shore or a stable platform, provide reassurance and a warm dry layer if cold, and let them process the emotion. Give them agency about whether to try again or observe for a while.
Gear problems
Issue: a paddle breaks mid-session. Fix: always carry at least 2 spare paddles in the support craft or on shore. In the interim, the affected canoe can paddle with one working paddle using a J-stroke or sweep strokes from the stern position.
Issue: a PFD buckle breaks or a strap comes loose. Fix: the student returns to shore immediately: no paddling without a secured PFD. Swap for a spare PFD or repair with duct tape as a temporary fix. This is why a pre-session gear check is essential.
Issue: water pooling in the bottom of a canoe. Fix: a small amount is normal and not dangerous: provide a bilge pump or large sponge if the water level rises above ankle height. If the leak is significant, bring the canoe to shore and switch to a spare canoe if available.
Group bottlenecks
Issue: getting everyone into canoes takes forever and students on shore get restless. Fix: stagger launches; as soon as 2–3 canoes are ready, send them out with clear instructions, keeping early-ready students engaged while others prepare. Assign student helpers to speed up the process.
Issue: long gaps between activities on the water where students drift aimlessly. Fix: have backup micro-challenges ready (“Practice your reverse strokes: can you move backward 10 metres?”). Engagement prevents boredom and unsafe behaviours.
Energy crashes and hydration
Issue: students suddenly have no energy and complaints increase. Fix: likely low blood sugar or dehydration: bring the group to shore or raft up, distribute snacks and water, and rest for 10 minutes. For half/full-day sessions, schedule mandatory snack breaks every 60–90 minutes regardless of whether students ask for them.
Issue: a student feels nauseous or dizzy on the water. Fix: could be dehydration, motion sickness, or heat stress: bring them to shore immediately, provide water, shade, and rest. If symptoms persist, they should remain on shore for the rest of the session. Never dismiss these symptoms.
12. Activity Variations and Extensions
Easier version (confidence-building): triple canoes with an adult; tethered exploration on long tethers attached to a jetty or instructor’s boat; follow-the-leader in line behind the instructor; very short routes (out 100 metres, simple turn, back to start).
Standard version: partner paddling to a series of markers or destinations; skill circuit rotating through stations; exploration journey (1–3km) with environmental observation tasks.
Challenge version: leadership rotation with students taking turns as “trip leader” (with instructor veto if needed); navigation challenge using a waterproof map and compass; expedition skills packing canoes for an overnight trip; time and distance goals appropriate for Year 9+ with good fitness; environmental stewardship combining paddling with water quality monitoring or shoreline clean-ups.
13. Cost and Resourcing Notes
What tends to drive cost:
| Cost driver | Typical range |
|---|---|
| Qualified instructors | $400–$800 per instructor per day (minimum 1 required) |
| Transport | $300–$600 per day if the venue is more than 30 minutes from school |
| Canoe purchase (if buying, not hiring) | $1,200–$2,500 each |
| PFD purchase | $80–$150 each |
| Paddle purchase | $100–$200 each |
| Site access fees | $50–$200 per day at some locations |
Providers include gear in their rates; schools purchasing outright face significant upfront costs.
Ways to keep it affordable: rotation stations (run canoeing as one of 3–4 concurrent activities to reduce instructor hours and gear quantity needed); shared gear arrangements with other schools or community groups; shorter sessions (a 1.5-hour taster costs significantly less than a full day); local venues to eliminate transport costs; teacher-led sessions where the school has qualified staff, eliminating instructor fees; grant applications, since outdoor education often qualifies for funding from sporting bodies, community trusts, or education grants.
Estimated total costs per student: provider-led half-day session typically $35–$65 per student (includes instruction, gear, site access); teacher-led with school-owned gear, $5–$15 per student (transport and consumables only); multi-day expedition, $150–$300 per student depending on location and duration.
14. Next Steps for Schools
Ready to bring flatwater canoeing to your students? Here’s your checklist:
- Check readiness: review this guide and confirm you understand the safety requirements, supervision ratios, and logistical needs. Assess your staff capability: do you have qualified water safety/paddling staff, or do you need a provider?
- Confirm venue: identify your preferred location and visit it in advance if possible. Check access, facilities, and water conditions, and confirm any booking or permit requirements.
- Brief parents: use the template in Parent Communication for Water Activities to inform families well in advance, and confirm consent specifically mentions water-based activities.
- Book a provider (if using external instruction): contact providers 6–12 weeks ahead of camp dates. Use the questions in Working with Outdoor Education Providers to assess suitability.
- Run a pre-camp skills session: 2–3 weeks before camp, use Student Preparation for Water Activities to prepare students physically and mentally.
Flatwater canoeing offers students an accessible, powerful outdoor learning experience that builds confidence, teamwork, and connection to New Zealand’s waterways. With proper planning and support, this activity can become a highlight of your school camp programme: creating memories and competencies that students carry forward for years.
Key Safety Standards and Guidelines
- Water Safety New Zealand (WSNZ): watersafety.org.nz
- Education Outdoors New Zealand (EONZ): eonz.org.nz
- Maritime NZ: maritimenz.govt.nz
- NZ Outdoor Instructors Association (NZOIA): nzoia.org.nz
Leave a Reply
You must be logged in to post a comment.