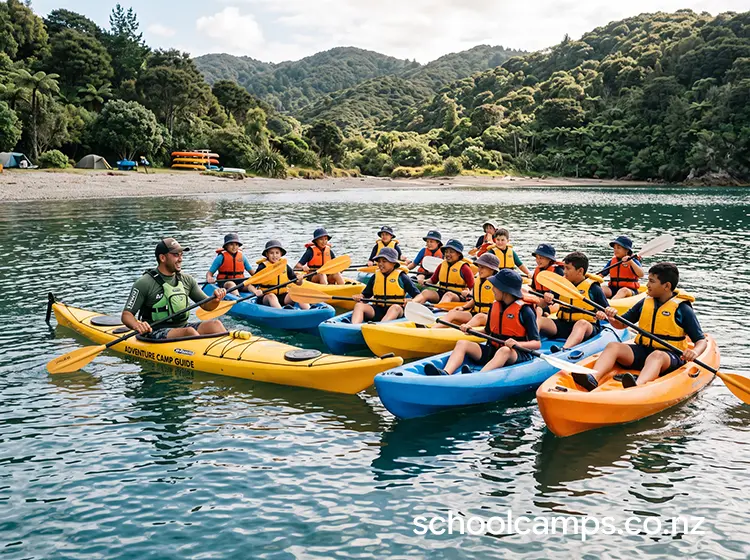
 This guide covers activity-specific elements of flatwater kayaking. For broader topics that apply across all water activities, see our standalone reference guides:
- Working with Outdoor Education Providers
- Parent Communication for Water Activities
- Student Preparation for Water Activities
- Behaviour Management Outdoors
- How to Debrief Outdoor Experiences
- Water Safety Foundations
1. Quick Overview
Flatwater kayaking introduces students to paddling in calm, sheltered water environments like lakes, estuaries, or protected harbour areas. Students learn basic paddle strokes, water safety, and boat control while exploring waterways from a completely different perspective. Most school sessions use sit-on-top kayaks (stable, self-draining, and nearly impossible to get trapped in) or wider recreational kayaks suited to beginners.
Unlike white-water kayaking, flatwater sessions focus on building confidence and foundational skills in predictable conditions. Students might paddle along a shoreline, explore an estuary inlet, practise rescue techniques in waist-deep water, or work together in tandem (double) kayaks. It’s an accessible activity that gets kids onto the water quickly while building respect for the marine environment and developing real outdoor competence.
Schools choose it because it builds personal confidence as students master a new skill and manage initial nervousness about being on water. Teamwork comes naturally: students help each other launch, offer encouragement when someone struggles with steering, and learn to work together in tandem boats. The activity develops resilience and problem-solving as paddlers figure out why they’re going in circles, adjust technique, and persist through tired arms. Students also gain practical outdoor skills (water safety awareness, reading weather and water conditions, respecting marine environments) and often develop a strong connection to local waterways.
Typical duration options
- Taster session (45–60 minutes): shore briefing, basic strokes practice, short guided paddle near the launch point, return and debrief. Good for confidence-building or as one station in a rotation day.
- Half-day session (2–3 hours): full safety briefing, skills practice, short journey to a destination (small island, beach, headland), return journey, structured debrief.
- Full-day session (4–6 hours): extended journey with lunch stop, opportunity for swimming/exploration, games on water, self-rescue practice, navigation challenges.
2. Learning Outcomes Teachers Can Actually Use
Personal skills: manages initial nervousness about being on water; builds confidence through mastering a progressive physical skill (forward stroke → turning → steering a course); demonstrates persistence when tired, frustrated, or going the wrong direction; shows self-regulation when others are progressing faster; takes positive risks within clear boundaries.
Social skills: communicates clearly with a paddle partner in tandem kayaks (coordination, rhythm, direction); offers specific encouragement to peers (“pull harder on your left side” vs “you’re doing great”); demonstrates tuakana-teina relationships by helping less confident paddlers; listens carefully to safety instructions and group signals; takes on rotating leadership roles (leading a small group, being “sweep” paddler, navigating to a marker).
Outdoor skills: develops efficient paddle technique through repetition and feedback; reads water and weather conditions (wind direction, current, chop, cloud build-up); understands and practises key water safety protocols; learns basic kayak/equipment care; builds awareness of marine environments.
Thinking skills: problem-solves steering challenges; makes quick decisions when conditions change; develops situational awareness (buddy location, distance from shore, instructor position); plans efficient routes; assesses personal limits honestly.
Wellbeing: experiences mana through competence in a traditional water-travel skill; connects with local waterways; regulates physical discomfort and continues; finds calm and mindfulness through rhythmic paddling; develops realistic confidence about personal water-safety capabilities.
3. Best Year Levels and Group Sizes
Suggested year levels
- Year 4–6: focus on confidence, basic strokes, and staying together as a group. Use tandem kayaks extensively. Keep sessions shorter (45–90 minutes) and closer to shore. Simpler safety briefings with very clear boundaries.
- Year 7–8: more independent single kayaks with increased stamina expectations. Can handle half-day journeys and basic navigation tasks. Capable of understanding more nuanced safety information (self-rescue, capsize protocols). Good age for introducing leadership rotations.
- Year 9–13: can manage full-day expeditions, more complex navigation, and extended decision-making. Suitable for advanced skills (edging, bracing, towing). Can take genuine responsibility for group safety awareness and environmental care.
Group size guidance
- Whole class (25–30 students): works with multiple instructors/supervisors and enough boats. Best with rotation stations (half on kayaks, half doing beach activities, then swap).
- Small rotations (8–12 students): ideal for quality instruction, close supervision, and individual feedback.
- Very large groups (60+): only feasible with multiple qualified instructors running simultaneous sessions at different zones, or staggered rotation throughout a full day.
Ratios and supervision
- Provider-led: typically 1:8–1:12 depending on student age, conditions, and experience. Younger or less experienced groups need tighter ratios (1:8). Instructors should hold at least NZOIA Kayak Level 1 or equivalent, with current first aid.
- Teacher-led: at least one teacher with kayaking competence and water-safety knowledge, recommended ratio 1:10 maximum, with additional adults in support kayaks or shore-based.
- Key principle: at least one competent paddler (instructor or skilled teacher) should always be on the water with students, with another responsible adult watching from shore or in a support craft.
4. Working with Providers
Deciding whether to run teacher-led or provider-led sessions, questions to ask providers, and what teachers should still do when working with external instructors:
See: Working with Outdoor Education Providers
5. Planning Checklist
Permissions and communications
For parent letter templates, consent requirements, and addressing common parent concerns, see Parent Communication for Water Activities.
Skills and fitness preparation
For pre-camp fitness activities, skill practices, and confidence-building exercises, see Student Preparation for Water Activities.
Gear and clothing
What’s provided (typical provider setup): kayaks (sit-on-top or recreational models), paddles (sized appropriately), PFDs, wetsuits or spray jackets if needed, safety equipment, dry bags for valuables.
What students bring: swim shorts/togs or quick-dry shorts and t-shirt as a base layer; long-sleeve rashie or sun shirt; wetsuit top if cold; old sneakers, dive booties, or secure sandals: no jandals; waterproof SPF 50 sunscreen, hat with strap, sunglasses with retainer; a full dry change sealed in a plastic bag; water bottle (1L minimum).
Cold/wet management: layer with a wetsuit or rashie as a base and a spray jacket over the top if windy or wet: avoid cotton, which stays cold when wet. Every student should have a complete spare set sealed in a dry bag or plastic bag; wind and evaporation cause cold stress even on warm days. Change into dry clothes immediately after paddling, even in sunshine, and have warm drinks ready.
Accessibility and inclusion
Confidence levels: pair nervous students with calm, encouraging peers in tandem kayaks; let anxious students start in ankle-deep water and progress gradually; offer roles like “shore crew” or “equipment manager”; set up a shallow-water practice zone where students can stand up anytime.
Neurodiversity: provide visual sequence cards for getting in/out of the kayak, paddle strokes, and safety signals; allow noise-cancelling headphones during shore briefing where a key adult repeats instructions individually; use clear, concrete instructions (“paddle blade goes in fully” vs “get a good catch”); consider tandem kayaks with a trusted adult for students who struggle with multi-step processing.
Physical needs: sit-on-top kayaks work well for students with limited core strength or balance challenges; adaptive paddles are available (bent shaft, foam grips); extra flotation or modified seating for students with specific support needs; consult providers in advance.
Keeping everyone involved: rotate leadership roles (navigator, group communicator, time-keeper, photographer); create small achievable challenges for less confident students; celebrate different strengths; offer legitimate shore-based roles with responsibility.
6. Safety, Risk, and Good Practice
Hazards to think about: wind changes (offshore winds are particularly dangerous, pushing kayaks away from shore); cold water (hypothermia risk even in summer if immersed for extended time); underwater obstacles (submerged logs, rocks, old pylons); currents or tidal movement (even gentle current exhausts beginners); sudden weather changes; capsizing and collisions between kayaks; overexertion and fatigue; sun exposure and dehydration; boat traffic and marine life; slippery ramps, docks, or boat launches.
Key controls: a comprehensive briefing covering PFD fitting, paddle grip, getting in/out safely, capsize procedure, boundaries, and signals; a buddy system where every kayaker has a designated buddy within voice contact; clear boundaries using visible markers; a weather check with clear wind/weather limits before launching; emergency communication (mobile phones in waterproof cases, whistle on every PFD); a headcount system before launching, during, and at the end. During the session: instructors positioned in lead and sweep formation to see all kayakers; regular check-ins every 15–20 minutes with visual headcount and buddy checks; adaptive pacing so the slowest paddler sets the pace; PFDs worn and fastened at all times, wetsuits if water temperature is below 15°C or air temperature below 18°C.
Roles on the day: a designated decision-maker (lead instructor or trip leader) with final authority on launching, returning early, and responding to incidents; a first aid carrier with a comprehensive kit in a waterproof dry bag; a communication carrier with a VHF radio and/or mobile phone; a shore contact who knows the route plan and has emergency numbers ready; an identified adult who carries any specific student’s medications.
When to stop or switch plans (red flags)
Stop immediately if: wind speed increases rapidly or shifts offshore; dark clouds with lightning observed; any student in the water shows signs of cold shock or hypothermia; the instructor or key supervisor is injured or ill; multiple equipment failures occur; a student repeatedly defies safety instructions; visual contact with any student is lost for more than 30 seconds.
Switch to Plan B if: conditions are marginal but not dangerous (light rain, slightly choppy); students are tiring faster than expected (shorten the route); one or two students need to leave the water (continue with the remaining group while a teacher supervises those ashore).
What a safe session looks like
- ✓ Every student has a properly fitted PFD checked by an instructor before launching
- ✓ Students demonstrate they’ve heard instructions: repeating signals back, showing correct paddle grip
- ✓ The group stays together; lead and sweep kayakers visible, no one more than 50m from the nearest supervisor
- ✓ Regular check-ins happen every 15–20 minutes with a headcount
- ✓ Students know and use emergency signals correctly
- ✓ Conditions are actively monitored for weather changes and signs of cold or fatigue
7. Site Selection and Conditions
What makes a location suitable: protected from wind and swell (sheltered bays, estuaries behind sandbars, lakes, harbour areas protected by headlands); gentle entry/exit (beach, boat ramp, or low dock); a shallow practice zone where students can stand close to shore; clear boundaries using natural markers; minimal boat traffic.
Deal-breakers: consistent strong wind funnelling through narrow harbour entrances or valleys; significant current or tidal race; heavy boat traffic with fast-moving vessels; polluted water; very cold water with no shallow warm-up zone.
Travel time and logistics: under 15 minutes from accommodation is ideal; 15–45 minutes is manageable with extra time for loading boats; over 45 minutes is only worthwhile for full-day sessions. Allow 20–30 minutes for unloading boats and carrying to the water’s edge.
Toilets, shelter, water access: toilets essential within a 5-minute walk of the launch site; shelter needed for briefing, lunch, and warming up if students get cold; fresh water for drinking and rinsing gear.
“Plan B” locations: a more sheltered section of the same waterway; a smaller nearby lake or pond; a wide, slow-flowing river section with no current. If weather is marginal everywhere: shorten to a 45-minute skills practice in very shallow water, or switch to land-based beach activities.
8. Session Structure Teachers Can Follow
This run-sheet works for a half-day session: adjust timing for tasters or full days.
1. Arrival and set-up (15 minutes): headcount and boundary check (“we paddle between this headland and that marker buoy, no further”); gear check (PFD, paddle, wetsuit if needed); instructor walks the shoreline pointing out hazards.
2. Briefing (15–20 minutes): individual PFD fitting check for every student; expectations and rules (listen first time, stay with your buddy, hands to self around gear, freeze on whistle); signals and commands (one whistle = stop and look, three whistles = emergency return, hand up = need help, “raft up” = paddle together and hold boats); buddy system assigned; capsize procedure demonstrated on shore.
3. Warm-up (10 minutes, on land): shoulder rolls, arm circles, torso twists; practice holding the paddle correctly; dry-land practice of sitting position and stroke motion; quick comprehension check.
4. Skill build (30–40 minutes, shallow water): launch sequence demonstrated and practised in pairs with instructor spotting; skills progression in knee-to-waist-deep water: sit still and feel stability, forward paddling, stopping, backward paddling, turning; instructor gives specific feedback; buddy check-ins.
5. Main challenge (45–60 minutes, deeper water within boundaries): choose one; journey to a destination (paddle as a group to a predetermined spot, raft up halfway for a water break, arrive, explore briefly, return); rotation stations (slalom course, tandem kayak teamwork, rescue practice, rotating every 15 minutes); or a group objective (retrieve an object, deliver a waterproof container to the opposite shore, photograph five bird species).
6. Cool-down and pack out (15 minutes): paddle slowly back at an easy pace; land kayaks safely; cold students change into a dry top immediately; carry kayaks to storage, rinse gear, hang PFDs to dry; everyone drinks water and has a snack.
7. Final headcount and debrief (10–15 minutes): full roll call before leaving the water area; quick circle debrief (see How to Debrief Outdoor Experiences); instructor highlights specific moments of growth; teacher connects to camp theme or curriculum focus.
9. Behaviour Management
For strategies on managing risk-takers, refusers, disengaged students, and creating positive reinforcement outdoors, see Behaviour Management Outdoors.
10. Reflection and Debrief
For debrief frameworks, facilitation tips, curriculum links, and reflection techniques, see How to Debrief Outdoor Experiences.
11. Common Issues and Fixes
Weather changes
Issue: wind picks up during the session. Fix: stop immediately, raft up the group, and assess. If wind is pushing toward shore, continue carefully in a tight formation; if pushing away from shore, return immediately with no exceptions, landing at the nearest safe beach.
Issue: thunderstorm approaches. Fix: lightning within 10km (audible thunder) means immediate evacuation to shore: do not wait to see if it gets closer. Once ashore, move away from water and isolated trees.
Seasickness, fear and tears
Issue: a student feels nauseous on choppy water. Fix: stop paddling, focus on the horizon rather than the water, eat dry crackers if available, breathe slowly. If it worsens, return to shore. Position the student in the middle of the group.
Issue: a student panics or cries on the water. Fix: paddle alongside, speak calmly, ask what specifically is scary. If they can’t calm down after 5 minutes, escort them back to shore with one supervisor while the group continues: don’t force them to stay out if genuinely distressed.
Gear problems
Issue: a paddle breaks. Fix: always carry 2–3 spare paddles. The student shares a tandem kayak with their buddy until a replacement is collected.
Issue: a PFD buckle fails. Fix: the student returns to shore immediately with an escort: no exceptions. Fit a spare PFD or the student sits out the remainder.
Group bottlenecks
Issue: long queues at the launch point. Fix: launch in an efficient sequence with two instructors spotting simultaneously and kayaks pre-positioned at the water’s edge.
Issue: students finish skill practice at different rates. Fix: have extension challenges ready for fast learners (“can you paddle backwards in a straight line?”).
Energy crashes and hydration
Issue: students are suddenly exhausted halfway through. Fix: raft up for a rest break with water and a quick energy snack. Consider a shorter return route.
Issue: a student shows signs of hypothermia (shivering, confusion, loss of coordination). Fix: this is urgent; get the student to shore immediately, remove wet clothing, wrap in dry towels or spare jackets, give a warm (not hot) drink, and seek medical assessment.
12. Activity Variations and Extensions
Easier version (confidence-building): tandem kayaks only, waist-deep maximum, a very short 15–20 minute loop always in view of the launch point, forward paddling only, higher ratio (1:6), warmer conditions. Perfect for Year 4–5 groups or first-time paddlers.
Standard version: a mix of single and tandem kayaks by student choice, a 40–60 minute round trip to a visible destination, progressive skills (forward, backward, turning, steering a bearing), standard ratio (1:8–1:10). Perfect for Year 6–8 groups.
Challenge version: primarily single kayaks, an extended 2+ hour journey with open water within safe boundaries, advanced skills (bracing, edging, towing), leadership rotations, navigation challenges using map and compass, lower ratio (1:12) if students are competent. Perfect for Year 9+ groups with previous kayaking experience, or as preparation for Duke of Edinburgh or multi-day expeditions.
13. Cost and Resourcing Notes
What tends to drive cost:
| Cost driver | Typical range |
|---|---|
| Qualified instructors | $40–$80 per hour per instructor |
| Kayak hire | $30–$60 per boat per day |
| PFD hire | $10–$15 per day |
| Wetsuit hire | $15–$25 per day |
| Site access / launching fees | $5–$30 per person or per vehicle |
For a class of 25 starting from scratch, gear hire alone can be $1,200–$2,000 per day; a half-day session with two instructors can add $600–$1,000 in labour.
Ways to keep it affordable: rotation stations (8–10 kayaks with three groups rotating rather than a full class fleet, cutting gear hire by two-thirds); shared gear pooling with other schools or a local kayaking club; shorter, well-structured sessions rather than long unstructured ones; local venues within 15 minutes to cut transport costs; upskilling a staff member with a provider-led training session so future sessions are teacher-led; grant funding from community trusts or outdoor education grants.
14. Next Steps for Schools
- Check readiness: review your school’s capability (qualified staff, equipment, budget) and decide on teacher-led, provider-led, or hybrid.
- Confirm venue: scout potential sites, check tidal/permission requirements (iwi consultation for culturally significant waterways, council permits, private landowner access), and have a backup venue identified.
- Brief parents: send information at least 2 weeks in advance using Parent Communication for Water Activities, with a clear clothing list and rationale.
- Book a provider (if used): compare providers using the questions in Working with Outdoor Education Providers, and book 6–12 months ahead for peak camp season (Terms 1 and 4).
- Run a pre-camp preparation session: 2–3 weeks before camp, use Student Preparation for Water Activities to build physical readiness, skills, and confidence.
- Prepare your teaching team: clarify roles on the day, share the run-sheet and emergency procedures with all staff, and pack the emergency kit.
Flatwater kayaking offers students an accessible, powerful outdoor learning experience that builds confidence, teamwork, and connection to New Zealand’s waterways. With the right planning and safety systems, it can be a highlight of your school camp programme.
Key Safety Standards and Guidelines
- Water Safety New Zealand (WSNZ): watersafety.org.nz
- Education Outdoors New Zealand (EONZ): eonz.org.nz
- Maritime NZ: maritimenz.govt.nz
- NZ Outdoor Instructors Association (NZOIA): nzoia.org.nz
Leave a Reply
You must be logged in to post a comment.