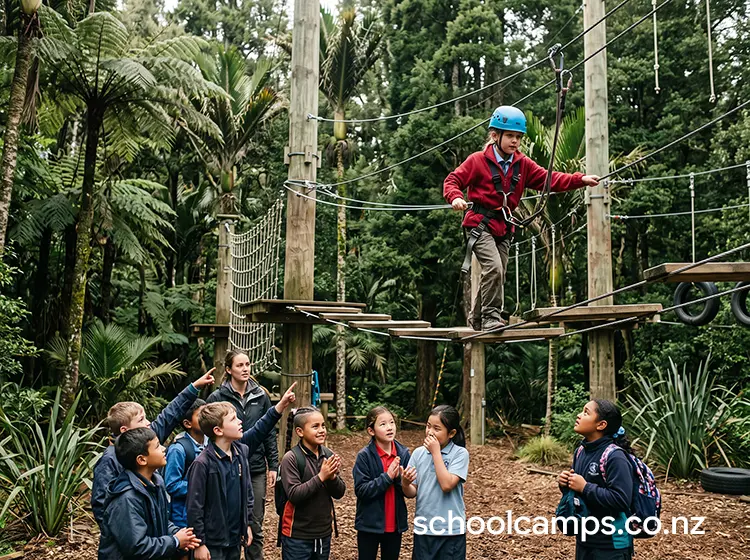
 This guide covers activity-specific elements of high ropes and challenge (low ropes/team-building) courses. For broader topics that apply across land-based activities, see our standalone reference guides:
- Working with Outdoor Education Providers
- Parent Communication for Land-Based Activities
- Student Preparation for Land-Based Activities
- Behaviour Management Outdoors
- How to Debrief Outdoor Experiences
- Land and Bush Safety Foundations
1. Quick Overview
Most camps and outdoor centres offer two related but distinct course types: low ropes/challenge courses (team-building elements at or near ground level, usually no harness required) and high ropes courses (elevated platforms, wire bridges, flying foxes and similar elements, always run on a harness-and-clip or continuous belay safety system). Many school programmes combine both: low ropes for group teamwork early in a camp, high ropes as an individual confidence challenge later on.
Schools choose this pairing because low ropes delivers strong, immediate teamwork and communication outcomes with almost no physical risk, while high ropes delivers a highly visible, personal confidence and resilience challenge that students frequently describe as a camp highlight, and because both are almost always run by trained venue staff, keeping the planning load on schools relatively light.
Typical duration options
- Taster session (1–1.5 hours): a handful of low ropes elements, or a short high ropes circuit with one or two elements.
- Half-day session (3 hours): a full low ropes team-building sequence, or a complete high ropes course circuit with harness fitting, briefing and multiple elements.
- Full-day session (5–6 hours): both low and high ropes in sequence, allowing time for a genuine team-building progression followed by the individual high ropes challenge.
2. Learning Outcomes Teachers Can Actually Use
Personal skills: builds confidence through a visible, voluntary physical and mental challenge; practises persistence when an element feels difficult; develops honest self-assessment of personal limits; manages fear of heights in a controlled, supported setting.
Social skills: communicates clearly and constructively under mild pressure during low ropes problem-solving; offers genuine encouragement rather than pressure to a nervous peer on high ropes; builds trust in a harness partner or belay system; demonstrates leadership and followership within a group task.
Outdoor/technical skills: understands and correctly uses harness and clipping systems; learns basic communication protocols for height-based activities; develops awareness of how safety systems (continuous belay lines, static lines) actually work.
Thinking skills: problem-solves group challenges with limited resources or communication constraints (classic low ropes format); assesses personal risk tolerance honestly on high ropes elements; adapts strategy when an initial group approach isn’t working.
Wellbeing: experiences genuine, earned confidence from completing a personally challenging element; low ropes in particular surfaces group dynamics and communication patterns in a way that translates directly to classroom and social settings; high ropes often produces a specific, memorable sense of achievement students reference well after camp.
3. Best Year Levels and Group Sizes
Suggested year levels
- Year 4–6: low ropes/team-building elements as the main focus; high ropes only on courses with a genuine junior-height option and close, reassuring instruction.
- Year 7–8: a full low ropes sequence plus a standard high ropes course, with good instructor support for nervous students.
- Year 9–13: full low and high ropes programme, including more demanding elements (longer high ropes circuits, flying fox, more complex team problems), and (at some venues) a facilitator-led leadership/team-building focus using the low ropes elements specifically.
Group size guidance
- Whole class (25–30 students): low ropes works well as a whole-class team-building day; high ropes usually needs to run as a rotation, since only a handful of students can be on course at once regardless of group size.
- Small groups (8–12 students): ideal for a facilitated low ropes team-building session with genuine group processing between elements.
- Very large groups (60+): feasible for low ropes with multiple facilitators running parallel elements; high ropes needs multiple courses/stations or a long rotation day.
Ratios and supervision
Low ropes: as a general guide, 1:12–1:15 with a trained facilitator, since the physical risk is low and the focus is group process rather than individual safety systems. High ropes: 1:8–1:12 is typical where the course uses a continuous belay/self-clipping system with close ground-based supervision, tightening to 1:4–1:6 for courses using a traditional harness-and-carabiner clipping system requiring more direct oversight. Facilitators should hold current, venue-specific training; some hold a broader qualification recognised through the New Zealand Register of Recreation Professionals or under Skills Active’s outdoor recreation unit standards.
4. Working with Providers
Deciding whether to run teacher-led or provider-led sessions, questions to ask providers, and what teachers should still do when working with external instructors:
See: Working with Outdoor Education Providers
High and low ropes are almost always run by a camp or outdoor centre’s own trained facilitation staff, since the courses themselves are fixed venue infrastructure requiring venue-specific training to operate safely. Ask specifically about the facilitator’s training and how often the course structure is professionally inspected: a well-run venue will have this information ready.
5. Planning Checklist
Permissions and communications
For parent letter templates, consent requirements, and addressing common parent concerns, see Parent Communication for Land-Based Activities. Fear of heights is a common and specific concern worth addressing directly: make clear that stopping or coming down at any point is always an option on high ropes.
Skills and fitness preparation
For general pre-camp confidence-building, see Student Preparation for Land-Based Activities. No specific physical preparation is required; a brief classroom conversation normalising nerves about heights and reinforcing that stopping is always fine does more good than physical prep.
Gear and clothing
What’s provided (typical venue setup): harnesses and helmets for high ropes; no specialist equipment for low ropes beyond what the elements themselves use.
What students bring: closefitting, comfortable clothing that allows free movement (avoid loose drawstrings or wide-leg trousers that can catch on gear for high ropes); enclosed shoes; hair tied back.
Weather management: high ropes courses are typically closed in lightning risk or high wind: confirm the venue’s specific weather thresholds and have a low ropes or indoor alternative ready.
Accessibility and inclusion
Confidence levels: let nervous students choose an easier element or a lower platform height on high ropes, and always frame stopping or coming down as a fine choice; on low ropes, offer non-physical roles (timekeeper, observer feeding back to the group) for anyone who wants to participate without the physical task.
Neurodiversity: give clear, step-by-step demonstrations of harness fitting and clipping systems; use consistent verbal safety commands; allow processing time before a new element is attempted; consider a practice run on an easier element before a harder one.
Physical needs: many venues can adapt or select elements for a range of physical needs: contact the venue in advance to discuss specific requirements and available adaptive options.
Keeping everyone involved: rotate roles on low ropes elements (planner, mover, timekeeper) so every student has a genuine part to play; on high ropes, celebrate reaching any point on the course, not just completing it; use ground-based cheering and support roles for students who choose not to attempt an element.
6. Safety, Risk, and Good Practice
Hazards to think about: falls from height on high ropes elements (managed by the harness/belay system, but human error or equipment fault remain risks); equipment failure (worn harnesses, faulty clips); facilitator or self-clipping errors; collisions or awkward falls on low ropes elements; overexertion; anxiety or panic partway through a high ropes element.
Key controls: a comprehensive safety briefing on harness fitting, clipping systems and communication commands before anyone starts; every element checked and set up by trained facilitators; a strict buddy-check or facilitator-check system before any high ropes element begins; clear spacing and queuing so students aren’t positioned dangerously close together on low ropes elements.
Roles on the day: a designated lead facilitator with final authority on which elements are open and when to pause for weather or equipment concerns; ground-based spotters positioned at key points on low ropes elements; a first aid carrier with a kit suited to falls and minor injuries; clear radio or verbal communication between ground and platform staff on high ropes.
When to stop or switch plans (red flags)
Stop immediately if: any equipment fault is identified (frayed harness webbing, a clip not engaging properly); a student is not correctly clipped in and the check step is skipped; weather crosses the venue’s stated safety threshold (wind, lightning); a student is visibly distressed and reassurance isn’t resolving it.
Switch to Plan B if: conditions are marginal (move to low ropes or an indoor alternative); a student is scared partway through a high ropes element (facilitator talks them through a safe, calm return to the platform: never rushed); queues build up (add a second low ropes element to rotate through).
What a safe session looks like
- ✓ Every harness is fitted and checked by a facilitator before the first element
- ✓ A clip/buddy check happens before every high ropes element, without exception
- ✓ Facilitators are actively watching, not just present, throughout the session
- ✓ Students use and respond correctly to standard safety commands
- ✓ Nervous students are supported to stop at their own comfort level, never pushed further
- ✓ Equipment has been visually checked at the start of the session
7. Site Selection and Conditions
What makes a location suitable: a venue with current safety certification for its course structures, trained facilitation staff, and enough capacity (platforms, elements) for your group size without excessive queuing.
Deal-breakers: a venue that can’t demonstrate current course inspection and staff training; insufficient elements or platforms for your group size; no clear weather-threshold policy for high ropes.
Travel time and logistics: most outdoor centres and dedicated ropes course venues are set up for group bookings and school-sized numbers: confirm capacity and rotation planning for your specific group size well ahead of time.
Toilets, shelter, water access: most purpose-built venues have full facilities on site: confirm shelter options for a group waiting its turn, particularly in poor weather.
“Plan B” locations: low ropes elements or an indoor team-building alternative are the standard fallback if weather closes the high ropes course for the day.
8. Session Structure Teachers Can Follow
This run-sheet works for a half-day combined session: adjust timing for tasters or full days.
1. Arrival and set-up (15 minutes): headcount; venue orientation.
2. Low ropes warm-up (45–60 minutes): a sequence of two to three team-building elements with facilitator-led group processing between each.
3. High ropes briefing (15–20 minutes): harness fitting for every student, checked individually; safety commands and clipping system explained and demonstrated.
4. High ropes course (60–90 minutes): students rotate through the course elements at their own pace, with facilitators supervising clipping and providing encouragement.
5. Cool-down and pack out (10–15 minutes): harnesses and gear returned and checked in.
6. Debrief (15–20 minutes): a fuller debrief than most activities warrant, since the low ropes elements especially are designed for group processing: see How to Debrief Outdoor Experiences; facilitator or teacher highlights specific teamwork and courage moments and connects to camp or classroom themes.
9. Behaviour Management
For strategies on managing risk-takers, refusers, disengaged students, and creating positive reinforcement outdoors, see Behaviour Management Outdoors. Low ropes elements in particular can surface group friction (blame, frustration, dominant personalities taking over): a good facilitator uses this as a teaching moment rather than letting it derail the session.
10. Reflection and Debrief
For debrief frameworks, facilitation tips, curriculum links, and reflection techniques, see How to Debrief Outdoor Experiences. Low ropes elements are specifically designed to generate rich debrief material about communication and teamwork: it’s worth allowing more time for this than a typical activity debrief.
11. Common Issues and Fixes
Fear and reluctance
Issue: a student refuses to start a high ropes element. Fix: never force it; offer an easier element, let them watch others first, or suggest trying just the first platform and coming straight back. Celebrate any attempt, however small.
Issue: a student freezes partway through a high ropes element. Fix: the facilitator calmly talks them through options (rest, continue, or return): returning is always framed as a completely fine choice, never a failure.
Group dynamics on low ropes
Issue: one student dominates the group’s problem-solving and others disengage. Fix: the facilitator introduces a rule (e.g., everyone must contribute an idea before the group commits to a plan) to rebalance participation.
Issue: the group blames one student for a failed attempt. Fix: the facilitator redirects to what the group can try differently next time, framing failure as data rather than fault.
Equipment and technique
Issue: a harness feels wrong mid-course. Fix: the student signals to a facilitator, comes to a safe stopping point, and the harness is refitted before continuing.
Issue: a student rushes clipping procedure. Fix: an immediate, calm reminder that speed is never the goal: a facilitator re-supervises their next clip directly.
Group management
Issue: students waiting their turn become restless or distracting. Fix: give waiting students a specific role (spotting, cheering, timing) rather than leaving them idle.
12. Activity Variations and Extensions
Easier version (confidence-building): low ropes only, with a focus on simple, high-success team challenges; a junior/lower-height high ropes option where available, with maximum facilitator reassurance.
Standard version: a full low ropes sequence followed by a standard high ropes course, rotating students through at their own pace.
Challenge version: more demanding high ropes elements (longer circuits, flying fox, greater height); a facilitator-led leadership-focused low ropes programme for older students, explicitly framed around communication and decision-making skills for a specific curriculum link.
13. Cost and Resourcing Notes
What tends to drive cost:
| Cost driver | Typical range |
|---|---|
| Low ropes/team-building session (half-day) | $25–$40 per student |
| High ropes course (half-day) | $35–$60 per student |
| Combined low and high ropes (full day) | $55–$90 per student |
| Transport to venue | $200–$500 per day if more than 30 minutes from school |
Ways to keep it affordable: booking through an outdoor centre already hosting your wider camp, since ropes courses are commonly included or discounted as part of a multi-activity package; running low ropes as a standalone team-building day (cheaper than high ropes) if budget is tight.
Estimated total costs per student: $40–$70 per student for a half-day session; $70–$110 for a combined full-day low and high ropes programme.
14. Next Steps for Schools
Ready to bring high ropes and challenge courses to your students? Here’s your checklist:
- Check readiness: review this guide and confirm your group size and available budget suit low ropes only, high ropes only, or a combined programme.
- Confirm venue: book an outdoor centre or dedicated ropes course venue with current safety certification and enough capacity for your group size.
- Brief parents: use the template in Parent Communication for Land-Based Activities, particularly addressing fear-of-heights concerns for high ropes.
- Book a provider: contact venues 6–12 weeks ahead of camp dates. Use the questions in Working with Outdoor Education Providers to assess suitability.
- Run a pre-camp confidence conversation: normalising nerves about heights and reinforcing that stopping is always an option pays off directly in participation on the day.
Leave a Reply
You must be logged in to post a comment.