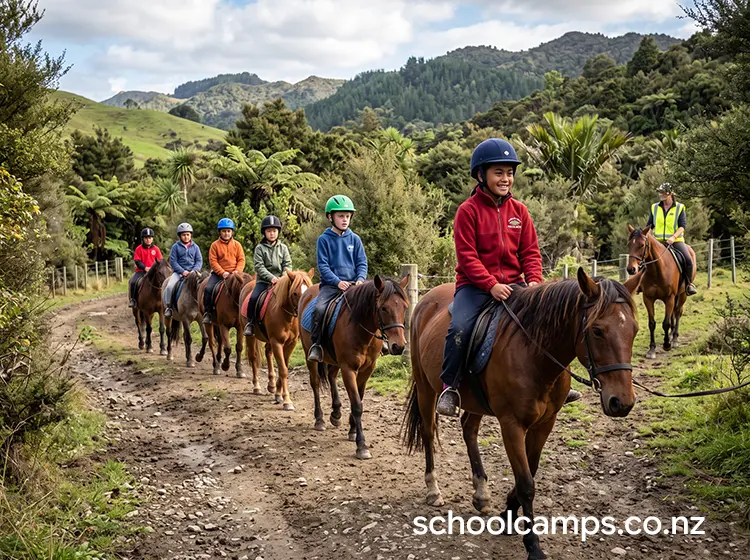
 This guide covers activity-specific elements of horse riding. For broader topics that apply across land-based activities, see our standalone reference guides:
- Working with Outdoor Education Providers
- Parent Communication for Land-Based Activities
- Student Preparation for Land-Based Activities
- Behaviour Management Outdoors
- How to Debrief Outdoor Experiences
- Land and Bush Safety Foundations
1. Quick Overview
Horse riding introduces students to ground handling and basic riding skills, almost always run at an established equestrian centre with its own horses, instructors, and arena, since this is one of very few school camp activities where the school essentially never supplies its own equipment or animals. Students are matched to a horse suited to their size and experience and ride under close, hands-on instructor supervision: often led on a rein for complete beginners.
Unlike most other camp activities, the core safety factor is a live animal rather than terrain, weather, or equipment, which changes the nature of the risk: horses are generally calm and predictable with correct handling, but can react suddenly to sudden movement, loud noise, or being startled. Good instruction spends real time on ground safety and horse behaviour before anyone gets in the saddle.
Schools choose it because it’s genuinely novel for most students, requires very little from the school itself (the venue supplies everything), and consistently produces strong, memorable outcomes in confidence, calm, and connection to animals.
Typical duration options
- Taster session (45–60 minutes): ground safety briefing, grooming and handling introduction, a short led ride in the arena. Good for younger or completely inexperienced groups.
- Half-day session (2–3 hours): ground handling, mounting and basic control instruction, a longer arena session progressing to simple independent riding for those ready.
- Full-day session (4–6 hours): extended riding instruction, possibly progressing to a short led trail ride for capable riders, plus deeper involvement in horse care.
2. Learning Outcomes Teachers Can Actually Use
Personal skills: builds confidence around a large animal, often described by students as a genuinely new kind of nervousness to work through; develops calm, controlled movement and communication; demonstrates persistence when a skill (steering, rising trot) takes repeated practice; takes responsibility for another living being’s wellbeing, not just their own experience.
Social skills: follows instructor direction promptly for safety; offers encouragement to peers who are more nervous; waits turns patiently around shared equipment and horses; develops empathy through caring for an animal that depends on calm, clear handling.
Outdoor/technical skills: learns correct ground handling and horse-safety awareness; develops basic riding technique (posture, steering, stopping); learns basic horse care (grooming, tacking up, depending on session length).
Thinking skills: reads horse body language and responds appropriately; problem-solves communication with an animal that doesn’t respond to verbal instruction alone; makes calm decisions under mild uncertainty.
Wellbeing: experiences genuine mana through building trust with a large animal; develops calm, regulated behaviour, since horses respond to and mirror a rider’s emotional state; builds confidence that often surprises students who arrived nervous.
3. Best Year Levels and Group Sizes
Suggested year levels
- Year 4–6: ground handling, grooming, and led riding only (an instructor leads the horse on a rein throughout). Focus on building comfort and basic safety awareness.
- Year 7–8: ground handling plus independent riding in a controlled arena setting for confident students, with led riding still available for beginners.
- Year 9–13: full riding instruction, with genuinely independent arena riding and, for capable and confident students at some venues, a short supervised trail ride.
Group size guidance
- Whole class (25–30 students): only feasible at a venue with enough horses and instructors to run multiple simultaneous sessions, or as a rotation activity where riding is one of several stations.
- Small groups (6–10 students): the practical norm for horse riding, since the venue’s horse and instructor numbers set a hard limit regardless of school preference.
- Very large groups: not realistic for horse riding in a single session: plan for staggered groups across the day or across the camp.
Ratios and supervision
Horse riding ratios are set by the venue based on horse and instructor numbers, not a general school supervision rule: expect roughly one instructor per 1–4 riders for led beginner riding, loosening only slightly for confident, independent riders in a controlled arena. This is a genuinely hands-on activity: an instructor is typically within arm’s reach of a beginner rider’s horse at all times, not supervising from a distance.
4. Working with Providers
Deciding whether to run teacher-led or provider-led sessions, questions to ask providers, and what teachers should still do when working with external instructors:
See: Working with Outdoor Education Providers
Horse riding is almost always fully provider-led, since schools rarely have their own horses or riding-qualified staff. Confirm the venue’s helmet standards meet Equestrian Sports NZ’s (ESNZ) current tagging regulations, and ask specifically how horses are matched to rider experience and size.
5. Planning Checklist
Permissions and communications
For parent letter templates, consent requirements, and addressing common parent concerns, see Parent Communication for Land-Based Activities. Consent forms should specifically name horse riding, including any animal-allergy questions.
Skills and fitness preparation
For pre-camp confidence-building and animal-safety discussion, see Student Preparation for Land-Based Activities.
Gear and clothing
What’s provided (typical venue setup): horses matched to rider size and experience, saddles and tack, and correctly fitted, standards-compliant helmets: confirm this is included, since a well-run venue will not let a student ride in an unapproved helmet.
What students bring: long trousers (to prevent chafing from the saddle: no shorts or skirts); enclosed shoes with a small heel (no jandals, sandals, or gumboots, which can catch in a stirrup); hair tied back to fit under a helmet.
Allergy management: some students have hay fever or mild animal allergies that only become apparent around horses: flag this as a specific question on consent forms rather than assuming general medical information will surface it.
Accessibility and inclusion
Confidence levels: let nervous students start with ground handling and grooming only, building toward riding at their own pace; led riding remains a completely legitimate option for a student who isn’t ready for independent riding, regardless of age.
Neurodiversity: predictable, repeated routines around each horse help students who find novel environments overwhelming; clear, calm, consistent instructions matter even more here, since a horse can pick up on a handler’s anxiety or unpredictability; allow a student to observe before participating if needed.
Physical needs: consult the venue directly and early: a good equestrian centre will have experience adapting mounting, seating, and support for a range of physical needs, and organisations like Riding for the Disabled NZ specialise specifically in this.
Keeping everyone involved: rotate roles (grooming, leading, riding, horse-care helper) so students who aren’t riding yet are still meaningfully involved; celebrate progress at every level, from a first successful grooming session to an independent canter.
6. Safety, Risk, and Good Practice
Hazards to think about: being stepped on, bumped, kicked, or bitten during ground handling; being unseated or falling while mounted; a horse spooking at sudden noise or movement; incorrect helmet fit or use; getting a foot caught in a stirrup; general unpredictability, since even calm, well-trained horses are living animals rather than equipment.
Key controls: a thorough ground-safety briefing before anyone approaches a horse (how to approach, how to move around a horse, what startles them); helmets fitted and checked by an instructor for every rider, meeting current ESNZ standards; horses matched carefully to rider size, experience, and confidence; an instructor within immediate reach of beginner riders at all times; a calm, quiet environment maintained around the horses, with sudden noise and running strictly prohibited.
Roles on the day: a lead instructor with overall authority on which horses are used and when to pause a session; a dedicated handler or leader for each beginner rider’s horse; a first aid carrier with a comprehensive kit, including awareness of any student allergies; a queue and ground-safety monitor for students waiting their turn near the horses.
When to stop or switch plans (red flags)
Stop immediately if: a horse shows signs of agitation or distress that aren’t quickly settled; a student is behaving unpredictably around the horses (running, shouting, sudden movements) after being warned; a helmet doesn’t fit correctly or meet current standards; a student shows signs of a significant allergic reaction; a rider is clearly beyond their confidence or skill level for the activity underway.
Switch to Plan B if: a student is nervous but willing (move them to ground handling or a led ride instead of independent riding); a horse is unsuitable for a particular student on the day (swap to a different horse rather than persisting); weather turns (move to an indoor arena if available, or pause outdoor riding).
What a safe session looks like
- ✓ Every rider wears a correctly fitted, standards-compliant helmet, checked by an instructor
- ✓ Ground-safety rules (calm movement, no running or shouting near horses) are understood and followed
- ✓ Horses are matched appropriately to each rider’s size, experience, and confidence
- ✓ An instructor is within immediate reach of every beginner rider
- ✓ Nervous students are supported with ground handling or led riding, never pushed into independent riding
- ✓ The environment around the horses stays calm and predictable throughout
7. Site Selection and Conditions
What makes a location suitable: an established equestrian centre with a fenced arena, well-cared-for and appropriately trained horses, and qualified instructors; good, non-slip footing in the arena; a clear separation between the riding area and any spectator or waiting space.
Deal-breakers: any venue that can’t demonstrate current instructor qualifications or horse welfare standards; a venue without enough horses or instructors for safe ratios at your group size; poor arena footing or fencing.
Travel time and logistics: most schools travel to an established equestrian centre rather than bringing horses to a camp site: factor this travel time into the day’s schedule, and confirm the venue’s own group-booking process well ahead of time given limited horse and instructor numbers.
Toilets, shelter, water access: almost always available at an established equestrian centre; confirm shade and water for both students and horses on hot days.
“Plan B” locations: many equestrian centres have an indoor arena as a standard wet-weather option: confirm this when booking rather than assuming it exists.
8. Session Structure Teachers Can Follow
This run-sheet works for a half-day session: adjust timing for tasters or full days.
1. Arrival and set-up (15 minutes): headcount; venue orientation; helmets fitted and checked for every student.
2. Briefing (15–20 minutes): ground safety rules (how to approach and move around a horse, staying calm and quiet); an introduction to horse behaviour and body language; the day’s plan explained.
3. Ground handling (20–30 minutes): grooming and basic handling introduction under close supervision, building comfort and confidence before anyone mounts.
4. Mounting and basic control (20–30 minutes): instructor-assisted mounting; basic position, steering, and stopping instruction, led on a rein for beginners.
5. Main riding session (45–90 minutes): choose one; led arena riding (beginners continue on a led rein with instructor alongside); independent arena riding (confident students practise steering, pace changes, and simple patterns); or, at some venues, a short supervised trail ride for capable, confident riders.
6. Cool-down and pack out (15 minutes): dismounting assisted by instructors; horses returned to care; helmets and any shared gear returned.
7. Debrief (10–15 minutes): quick circle debrief (see How to Debrief Outdoor Experiences); instructor highlights specific moments of courage and connection; teacher connects to camp theme or curriculum focus.
9. Behaviour Management
For strategies on managing risk-takers, refusers, disengaged students, and creating positive reinforcement outdoors, see Behaviour Management Outdoors. Around horses specifically, calm, quiet behaviour is a safety requirement, not just good manners: students who can’t maintain this after a clear warning need to step back from ground handling or riding for the remainder of the session.
10. Reflection and Debrief
For debrief frameworks, facilitation tips, curriculum links, and reflection techniques, see How to Debrief Outdoor Experiences.
11. Common Issues and Fixes
Fear and reluctance
Issue: a student is too scared to approach or mount a horse. Fix: never force it; ground handling and grooming are legitimate full participation on their own, and many students who start with grooming only ask to ride later in the session once comfortable.
Issue: a student becomes anxious mid-ride. Fix: the instructor stops the horse calmly, reassures the student, and either continues at a slower pace or has them dismount: always framed as a sensible choice, not a failure.
Horse behaviour
Issue: a horse becomes unsettled by noise or activity nearby. Fix: the instructor calms the horse and, if needed, moves the group to a quieter area; this is why maintaining a calm environment around the horses is a rule from the outset, not just good practice.
Issue: a student is nipped or bumped during ground handling. Fix: first aid as needed; review with the student what happened (often a handling or positioning correction) and support them to try again with adjusted technique rather than avoiding horses entirely.
Equipment and fit
Issue: a helmet doesn’t fit correctly. Fix: the student doesn’t ride until a correctly fitted, standards-compliant helmet is sourced: no exceptions, regardless of time pressure.
Issue: a saddle or stirrup needs adjustment mid-session. Fix: the instructor makes the adjustment before continuing; minor discomfort should always be raised immediately rather than tolerated.
Group management
Issue: students waiting their turn become restless near the horses. Fix: have a ground-based activity (grooming a second horse, a horse-care discussion) to keep waiting students engaged and calm rather than idle and noisy.
12. Activity Variations and Extensions
Easier version (confidence-building): ground handling and grooming only, or a fully led rein ride at walking pace throughout, with no expectation of independent control.
Standard version: instructor-led progression from ground handling through to basic independent arena riding for confident students.
Challenge version: for experienced or confident riders, a short supervised trail ride at venues that offer it, or introduction to rising trot and simple pattern work in the arena.
13. Cost and Resourcing Notes
What tends to drive cost:
| Cost driver | Typical range |
|---|---|
| Instructor-led riding session (horse, tack and instruction included) | $40–$70 per student per session |
| Helmet hire (if not bundled into session cost) | Usually included; confirm when booking |
| Transport to equestrian centre | $200–$500 per day if more than 30 minutes from school |
Ways to keep it affordable: booking a full-day rate rather than several shorter sessions if the venue offers it; combining multiple classes into one visit to a single venue to reduce per-trip transport costs; checking whether Riding for the Disabled NZ or a local pony club offers a lower-cost community session, where relevant to your group.
Estimated total costs per student: a standard half-day session at an equestrian centre, $45–$80 per student including instruction and transport allowance.
14. Next Steps for Schools
Ready to bring horse riding to your students? Here’s your checklist:
- Check readiness: review this guide and confirm your group size fits within realistic venue horse and instructor numbers: this activity is provider-led essentially without exception.
- Confirm venue: contact an established equestrian centre early, since horse and instructor availability is the binding constraint on group size and timing.
- Brief parents: use the template in Parent Communication for Land-Based Activities to inform families well in advance, including the allergy question.
- Book a provider: contact equestrian centres 6–12 weeks ahead of camp dates, particularly for larger groups. Use the questions in Working with Outdoor Education Providers to assess suitability.
- Run a pre-camp confidence session: 2–3 weeks before camp, use Student Preparation for Land-Based Activities to address animal-safety awareness and any fears.
Leave a Reply
You must be logged in to post a comment.