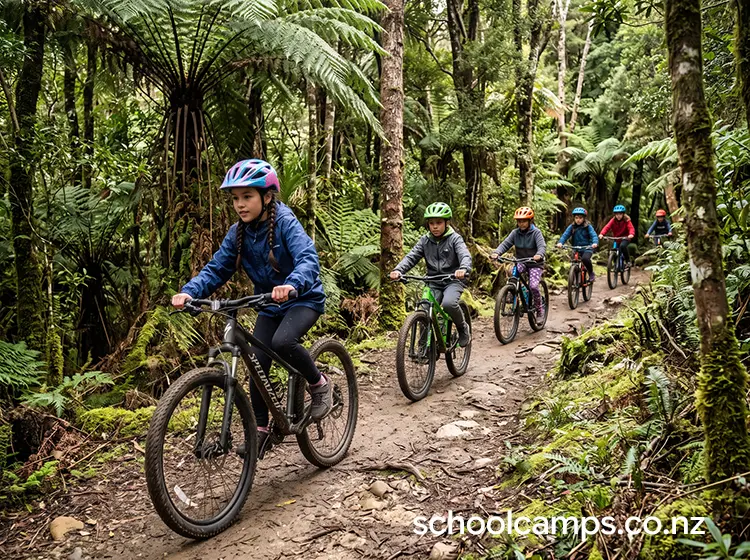
 This guide covers activity-specific elements of mountain biking. For broader topics that apply across land-based activities, see our standalone reference guides:
- Working with Outdoor Education Providers
- Parent Communication for Land-Based Activities
- Student Preparation for Land-Based Activities
- Behaviour Management Outdoors
- How to Debrief Outdoor Experiences
- Land and Bush Safety Foundations
1. Quick Overview
New Zealand’s purpose-built mountain bike parks (graded on the same green/blue/black system as ski fields) make this one of the more accessible outdoor activities to scale to a whole class, since most parks offer a genuine beginner-friendly loop alongside more technical trails for confident riders. Sessions typically run through a bike park or forest trail network with hired bikes and helmets, an instructor or guide briefing on trail etiquette and bike handling, then supervised riding in small groups matched to ability.
Schools choose it because it’s genuinely inclusive of a wide skill range on the same trip (unlike an activity with one fixed difficulty level), builds real, transferable fitness and bike-handling skill, and most regional centres now have a bike park within a reasonable drive, keeping logistics simpler than a activity needing a specific natural feature.
Typical duration options
- Taster session (1–2 hours): bike fit and basic handling skills in a skills area, then a single easy loop.
- Half-day session (3–4 hours): skills session followed by two to three graded trails matched to group ability, with a rest and regroup between each.
- Full-day session (5–7 hours): extended trail riding across multiple grades, a longer or more technical trail for confident riders, and a dedicated bike-handling skills clinic.
2. Learning Outcomes Teachers Can Actually Use
Personal skills: builds genuine physical fitness and bike-handling competence; develops persistence riding a trail that feels hard on a first attempt; practises honest self-assessment of ability before choosing a trail grade; manages fear on technical features within a self-paced, opt-in structure.
Social skills: encourages a struggling rider without being condescending; waits for slower riders at trail junctions rather than riding off; communicates trail hazards to riders behind (“hole,” “rider down”); demonstrates patience queuing for shuttle transport or trail access.
Outdoor/technical skills: develops core bike-handling technique (braking, cornering, body position on descents); reads trail conditions and adjusts speed and line accordingly; learns basic pre-ride bike checks (brakes, tyre pressure, quick-release levers).
Thinking skills: assesses a trail grade honestly against personal ability before riding it; makes rapid line-choice decisions on technical sections; plans pacing across a longer ride; problem-solves minor mechanical issues (dropped chain, seat height) with guidance.
Wellbeing: builds real fitness and coordination in an enjoyable, game-like setting; experiences the specific satisfaction of clearing a technical feature that felt intimidating; develops comfort with calculated physical risk in a well-controlled environment; often reaches students who don’t engage with more traditional sport.
3. Best Year Levels and Group Sizes
Suggested year levels
- Year 4–6: wide, smooth green-grade trails or a skills area only, with a strong focus on braking and basic control rather than trail riding proper.
- Year 7–8: green and easier blue-grade trails, introduction of cornering and small technical features, short guided rides.
- Year 9–13: full grade range up to the group’s actual ability, longer rides, and (for experienced riders) an introduction to more technical black-grade features under direct guide supervision.
Group size guidance
- Whole class (25–30 students): works well split into ability-based sub-groups of 6–8, each with its own guide, riding different trails simultaneously.
- Small groups (8–12 students): ideal for a single guided group covering more trail variety in one session.
- Very large groups (60+): needs multiple guides and a staggered start, or a bike park with enough capacity and trail width to run several groups independently.
Ratios and supervision
As a general guide: 1:10–1:12 for green-grade trail riding with competent riders, tightening to 1:6–1:8 for blue-grade trails or mixed-ability groups, and 1:4–1:6 for any technical or black-grade riding. A qualified guide should hold a current NZOIA Mountain Bike qualification appropriate to the terrain, and groups should never be split beyond what a single qualified leader can directly supervise on trail.
4. Working with Providers
Deciding whether to run teacher-led or provider-led sessions, questions to ask providers, and what teachers should still do when working with external instructors:
See: Working with Outdoor Education Providers
Most schools use a bike park’s own guiding staff or an independent mountain bike guiding provider, since trail grading knowledge and group management on varied terrain both take real local experience: confirm the guide holds a current NZOIA Mountain Bike qualification and knows the specific trail network well.
5. Planning Checklist
Permissions and communications
For parent letter templates, consent requirements, and addressing common parent concerns, see Parent Communication for Land-Based Activities.
Skills and fitness preparation
For pre-camp fitness and confidence-building activities, see Student Preparation for Land-Based Activities. Basic bike confidence (braking, balance, gear changes) built on a school playground beforehand makes a real difference to how much of the session is spent on trail rather than on fundamentals.
Gear and clothing
What’s provided (typical bike park hire): mountain bike sized to rider, helmet, and often gloves; some parks include body armour for more technical grades.
What students bring: closed-toe shoes that can grip pedals, clothing suited to weather and possible falls (avoid loose drawstrings or wide trousers that can catch in the chain), sunglasses or clear glasses for eye protection, a water bottle, sunscreen.
Weather management: trails become significantly more hazardous when wet (reduced traction, deeper ruts): have an indoor or lower-key backup plan, and check with the venue on trail closures after rain, since many bike parks close specific trails to protect them when wet.
Accessibility and inclusion
Confidence levels: let nervous riders start and stay on the skills area or easiest loop for as long as they want, with no pressure to progress; pair less confident riders with a patient buddy rather than the fastest rider in the group.
Neurodiversity: give clear, one-step-at-a-time instructions for bike handling; use consistent verbal trail commands (“stopping,” “passing,” “rider down”); allow extra processing time before a technical feature; consider a practice run on the skills area before any group ride.
Physical needs: many bike parks offer adaptive bikes or can advise on suitable trail grades for specific physical needs: contact the venue well ahead of time to check adaptive equipment availability.
Keeping everyone involved: rotate who leads the group at a comfortable pace; celebrate completing a trail over speed; offer a “trail marshal” role (waiting at a junction to point the way) for a student who wants a break from riding.
6. Safety, Risk, and Good Practice
Hazards to think about: falls from the bike (the most common injury source, ranging from minor to serious depending on speed and terrain); collisions with other riders or trail users; mechanical failure (brakes, chain, tyres); riders exceeding their ability on a trail grade; dehydration and fatigue on longer rides; sun exposure on exposed trail sections.
Key controls: a mandatory helmet-and-bike-check before every ride; a clear briefing on trail etiquette (calling out when passing, giving way appropriately, stopping well clear of blind corners); riders grouped and paced by genuine ability, not by friendship groups; a sweep rider at the back of every group so no one is ever left alone on trail.
Roles on the day: a designated decision-maker (lead guide) with authority to change trail plans for conditions or group fatigue; a sweep rider at the back of each sub-group; a first aid carrier with a kit suited to grazes and falls; a point of contact for mechanical issues.
When to stop or switch plans (red flags)
Stop immediately if: a bike check reveals a genuine mechanical fault (failing brakes, loose headset); a rider is clearly beyond their ability on the trail chosen and refusing to dismount or walk a section; trail conditions have deteriorated (rain, fallen debris) beyond what was briefed; any rider is unaccounted for at a regroup point.
Switch to Plan B if: conditions are marginal (move the group to an easier or wider trail, or the skills area); a rider is struggling with confidence (they walk a technical section rather than ride it: always an acceptable option); the group is fatigued faster than planned (shorten the remaining route).
What a safe session looks like
- ✓ Every bike and helmet is fitted and checked before the first ride
- ✓ Trail choice matches the group’s genuine, honestly assessed ability
- ✓ A sweep rider stays behind the last rider at all times
- ✓ Riders regroup at every junction before continuing as one group
- ✓ Walking a technical section is treated as a completely normal, encouraged choice
- ✓ A clear communication plan exists for a mechanical or medical issue on trail
7. Site Selection and Conditions
What makes a location suitable: a purpose-built bike park with clearly graded trails, current trail maintenance, and a skills area for beginners; enough trail variety to match a mixed-ability class.
Deal-breakers: a venue with no graded skills area for genuine beginners; trails closed or degraded from recent weather; no rescue/emergency access plan for the trail network.
Travel time and logistics: most regional centres now have a bike park within an hour’s drive: confirm bike hire numbers and sizes are booked well ahead, since school-sized groups can exceed a smaller park’s hire fleet.
Toilets, shelter, water access: most bike parks have facilities at the main hub; confirm water refill points if trails range far from the base area.
“Plan B” locations: the skills area or easiest green loop is the standard fallback for deteriorating weather or a group needing a confidence reset.
8. Session Structure Teachers Can Follow
This run-sheet works for a half-day session: adjust timing for tasters or full days.
- Arrival and set-up (20 minutes): headcount; bike and helmet fitting for every rider; quick pre-ride bike check taught and demonstrated.
- Briefing (15 minutes): trail etiquette, hand signals and verbal calls, group formation and regrouping points explained.
- Skills warm-up (20–30 minutes): braking, cornering and basic technique practised in the skills area before any trail riding begins.
- First trail (45–60 minutes): an easy grade trail for the whole group to build trail-specific confidence and confirm ability groupings are accurate.
- Main ride (60–90 minutes): ability-matched trails for each sub-group, with regular regroup points.
- Cool-down and pack out (15 minutes): bikes and helmets returned and checked in; final headcount.
- Debrief (10–15 minutes): quick circle debrief (see How to Debrief Outdoor Experiences); guide highlights specific moments of skill growth; teacher connects to camp theme or curriculum focus.
9. Behaviour Management
For strategies on managing risk-takers, refusers, disengaged students, and creating positive reinforcement outdoors, see Behaviour Management Outdoors. Mountain biking in particular needs a firm, early line on riders showing off beyond their ability or riding ahead of the group: treat this as a safety issue, not just a behaviour one.
10. Reflection and Debrief
For debrief frameworks, facilitation tips, curriculum links, and reflection techniques, see How to Debrief Outdoor Experiences.
11. Common Issues and Fixes
Fear and reluctance
- Issue: a student is nervous about a specific trail feature. Fix: they dismount and walk it (always framed as a sensible choice, not a failure) and try riding it only if and when they choose to.
- Issue: a student is overconfident and pushing beyond the group’s chosen grade. Fix: redirect firmly to the group’s trail plan; offer a genuinely harder trail later in the session as an outlet if their ability supports it.
Pacing issues
- Issue: the group spreads out too far on trail. Fix: set firm regroup points before every junction and enforce them; slow the pace of the lead rider rather than rushing the back.
- Issue: riders tire faster than expected. Fix: shorten the remaining route and prioritise an easier trail back to base over pushing through fatigue.
Equipment and technique
- Issue: a dropped chain or minor mechanical issue mid-ride. Fix: the group pauses at a safe, wide point while the guide or a competent adult fixes it: never mid-trail on a blind corner.
- Issue: a bike doesn’t fit well. Fix: readjust seat height and check brake reach before continuing; swap bikes if a genuine size mismatch is found.
Group management
- Issue: riders are racing each other on trail. Fix: an immediate, calm reminder that trail riding isn’t a race; repeat behaviour means that rider rides directly behind the guide for the remainder of the session.
12. Activity Variations and Extensions
Easier version (confidence-building): skills-area-only session with no trail riding; a single, very short, flat loop; a “balance and braking” focus session with no technical features at all.
Standard version: a progression from an easy warm-up trail to ability-matched grades; basic technique coaching throughout; regular regroup points.
Challenge version: longer, more technical trails for confident riders; a timed or distance-based personal challenge; for students wanting to continue, a pathway toward club-based mountain biking or NZOIA Mountain Bike-guided multi-day trips.
13. Cost and Resourcing Notes
What tends to drive cost:
| Cost driver | Typical range |
|---|---|
| Bike, helmet and gear hire | $40–$70 per student per day |
| Qualified guide | $400–$650 per guide per day |
| Trail/park access fee | $10–$20 per student |
| Transport to venue | $200–$500 per day if more than 30 minutes from school |
Ways to keep it affordable: booking a bike park’s own group programme rather than a separate travelling provider; running the activity as one full-day booking rather than splitting across multiple shorter visits; grouping multiple classes into one session to spread guide costs.
Estimated total costs per student: $60–$110 per student for a half-day session including bike hire, guide and access fees.
14. Next Steps for Schools
Ready to bring mountain biking to your students? Here’s your checklist:
- Check readiness: review this guide and confirm you understand the safety requirements, supervision ratios, and logistical needs.
- Confirm venue: book a bike park with a graded trail network and enough hire bikes for your group size, well ahead of your date.
- Brief parents: use the template in Parent Communication for Land-Based Activities to inform families well in advance.
- Book a provider (if using external guiding): contact providers or the venue 6–12 weeks ahead of camp dates. Use the questions in Working with Outdoor Education Providers to assess suitability.
- Run a pre-camp confidence session: basic bike handling in a school car park or field beforehand pays off directly in trail time on the day.
Leave a Reply
You must be logged in to post a comment.