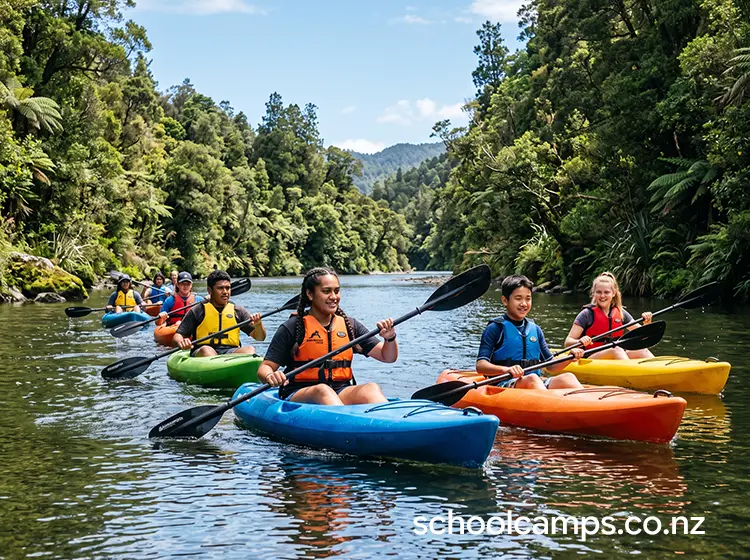
 This guide covers activity-specific elements of moving-water kayaking. For broader topics that apply across all water activities, see our standalone reference guides:
- Working with Outdoor Education Providers
- Parent Communication for Water Activities
- Student Preparation for Water Activities
- Behaviour Management Outdoors
- How to Debrief Outdoor Experiences
- Water Safety Foundations
1. Quick Overview
Moving-water kayaking introduces students to paddling on rivers or streams with gentle to moderate current. Unlike flatwater kayaking on lakes or calm harbours, this activity teaches participants to read moving water, navigate currents, and make quick decisions while maintaining control of their craft. Students learn fundamental river skills including eddy turns, ferry gliding, and safe river running in a controlled environment suitable for beginners.
The activity typically takes place on Grade 1–2 rivers with clear entry and exit points, shallow depths, and predictable flow patterns. Students paddle in stable sit-on-top or recreational kayaks, wearing full safety gear including helmets, buoyancy aids, and thermal protection. Instruction progresses from basic strokes and self-rescue in calm eddies to navigating gentle rapids under close supervision.
Moving-water kayaking builds confidence through progressive challenge in a dynamic environment. Students who may feel hesitant initially often experience significant personal growth as they navigate their first rapid or master an eddy turn. The river environment connects students with Aotearoa’s waterways in a meaningful way, fostering environmental awareness and respect for natural forces, while building resilience as they learn to read water, make quick decisions, and recover from capsizes.
Typical duration options
- Taster session (1.5–2 hours): introduction to moving water in a sheltered river section, basic river strokes, eddy turns, and a short moving-water paddle.
- Half-day (3–4 hours): thorough instruction, skill practice, and a small river journey covering 1–3km.
- Full-day (5–7 hours): extended river journey (3–8km) combining instruction with more challenging features and deeper skill development.
2. Learning Outcomes Teachers Can Actually Use
Personal skills: building confidence through progressive challenge in a dynamic environment; managing nerves and staying calm when facing uncertain situations (approaching rapids, capsizing); developing persistence and resilience when learning new physical skills; experiencing mana and accomplishment from mastering river navigation.
Social skills: communicating clearly in a challenging environment using signals and warnings; offering encouragement and support to peers facing their fears; demonstrating leadership by modelling safe practices; practising tuakana-teina as more confident paddlers guide beginners.
Outdoor skills: developing water-based movement skills (balance, boat control, stroke technique); understanding and managing specialised gear (kayak, paddle, PFD, helmet, wetsuit); reading water conditions (current, eddies, obstacles, safe channels); performing basic self-rescue and wet exits.
Thinking skills: making quick decisions about line choice and navigation in real time; problem-solving when things don’t go as planned; developing situational awareness (peer locations, hazards, changing conditions).
Wellbeing: building mana through achievement and competence in a challenging environment; practising self-regulation (managing fear, staying focused); engaging in positive risk-taking with appropriate safety systems.
3. Best Year Levels and Group Sizes
Suggested year levels
- Year 5–6: suitable for moving-water introduction with careful site selection. Keep sessions shorter (1.5–2 hours), use very gentle water (Grade 1 maximum), and ensure high instructor ratios. Focus on fun, basic skills, and confidence rather than distance.
- Year 7–10: the ideal age range for most moving-water programmes. Students have sufficient strength and coordination, process safety instructions reliably, and can progress to Grade 1–2 water.
- Year 11–13: excellent for more advanced or extended programmes: leadership roles, longer distances, more technical sections, and deeper engagement with environmental and risk management concepts.
Group size guidance
- Small groups (8–12 students): best for quality instruction and safety management in more challenging water.
- Medium groups (12–18 students): standard for programmes with 2–3 qualified leaders splitting the group or rotating teaching stations.
- Large groups (18+ students): requires rotation stations (some paddle while others practise land-based river safety) or multiple concurrent sessions on different river sections.
Ratios and supervision
- Standard ratio: 1 qualified kayaking instructor per 6–8 students in the water, allowing visual contact with all paddlers.
- Provider roles: lead technical instruction, demonstrate skills, manage on-water safety, make line-choice and continuation decisions, provide rescue support.
- Teacher roles: maintain overall student accountability, manage behaviour and group dynamics, support pastoral care (anxiety, cold, fatigue), reinforce learning outcomes, and provide an additional set of eyes for safety.
4. Working with Providers
Deciding whether to run teacher-led or provider-led sessions, questions to ask providers, and what teachers should still do when working with external instructors:
See: Working with Outdoor Education Providers: for this activity, look specifically for NZ Kayak Level 1 River qualification (minimum) and current river rescue training.
5. Planning Checklist
Permissions and communications
For parent letter templates, consent requirements, and addressing common parent concerns, see Parent Communication for Water Activities.
Skills and fitness preparation
For pre-camp fitness activities, skill practices, and confidence-building exercises, see Student Preparation for Water Activities.
Gear and clothing
What’s typically provided by the operator: kayaks, paddles, buoyancy aids (PFDs), helmets, wetsuits or spray jackets, and safety/rescue equipment.
What students must bring: quick-dry base layers (thermal top and leggings or board shorts), secure water-friendly footwear (old trainers or neoprene booties: no jandals), towel, complete change of warm dry clothes, water bottle, sunscreen, and sunhat.
Cold and wet management: layer clothing; thermal base layer, wetsuit (provided), and spray jacket if conditions are cool. Absolutely no cotton. Footwear must stay on securely. Pack spare warm clothes in a waterproof dry bag, and bring a warm drink in a thermos for after the session.
Accessibility and inclusion
Confidence levels: allow nervous students to practise wet exits and self-rescue in very shallow, calm water before entering moving current; offer tandem or double kayaks for extra support; create a development group that stays in easier water while more confident paddlers progress.
Neurodiversity: provide clear, simple visual instructions alongside verbal briefings; allow processing time and avoid overwhelming students with too much information at once; designate a quiet zone for sensory breaks.
Physical needs: discuss specific needs with your provider in advance; consider sit-on-top kayaks, which are easier to enter/exit; ensure shore-based roles are available for students who cannot or choose not to paddle.
6. Safety, Risk, and Good Practice
Hazards to think about: drowning or near-drowning (the primary hazard); cold water immersion and hypothermia; entrapment in submerged obstacles (branches, rocks, undercut banks); impact injuries from rocks or other kayaks; strains and sprains from paddling or lifting kayaks; getting separated from the group in current; environmental hazards (sunburn, dehydration, leptospirosis from contaminated water).
Key controls: a thorough briefing covering the capsize drill, signals, boundaries, and river-specific hazards; clear boundaries using visible landmarks (“we stop before the bridge”); a buddy system with regular check-ins; whistles and hand signals that carry over water noise, with lead and sweep positions maintaining radio contact; weather monitoring of rainfall upstream and current water levels; properly fitted helmets, buoyancy aids, and thermal protection inspected before launch.
Roles on the day: the lead kayaking instructor has final authority to modify or cancel based on water levels, weather, or group readiness (teachers raise concerns but defer to technical judgement); at minimum one qualified first aider accompanies the group with a waterproof kit and communication device; one person should remain within cell coverage where possible.
When to stop or switch plans
- River level rises significantly or becomes discoloured from rainfall
- Lightning or severe weather approaches
- Multiple students show signs of hypothermia (shivering, confusion, clumsiness)
- Students repeatedly fail to follow safety instructions despite warnings
- A serious injury occurs requiring evacuation
- The group is not coping with the level of challenge (multiple capsizes, visible fear, inability to control boats)
What a safe session looks like
- ✓ All students can be seen by at least one instructor at all times
- ✓ Equipment fits properly and students know how to adjust their own gear
- ✓ Students demonstrate capsize procedures correctly before entering moving water
- ✓ Clear signals are established and students respond appropriately
- ✓ Regular headcounts occur at designated points
- ✓ Students ask questions if unsure and instructors check for understanding
Minimum skill progressions. Before entering moving water, students should be able to perform a wet exit in calm shallow water, float with a PFD and swim 10 metres while holding the kayak, demonstrate a basic forward stroke, and respond correctly to hand signals and whistle commands. Before progressing from Grade 1 to Grade 2 water, they should consistently eddy out on both sides of the river, maintain boat control in gentle current, and have successfully self-rescued after capsizing in moving water.
Common mistakes to avoid: underestimating cold (water feels much colder than air temperature suggests: always prepare for colder conditions than expected); skipping capsize practice (always drill wet exits in controlled conditions first); poor group spacing (maintain 2–3 boat lengths between paddlers); ignoring early signs of fatigue; inadequate sun protection (water reflects UV strongly, even on overcast days).
7. Site Selection and Conditions
What makes a location suitable: Grade 1–2 water with gentle current, small predictable waves and riffles, and clear channels with few obstacles; safe entry and exit via gradual banks or designated boat ramps; a manageable length (1–3km for half-day sessions); eddies for skill practice; good water quality (avoid sections downstream of wastewater discharge or intensive farming with high leptospirosis risk); road access at put-in and take-out.
Travel time and logistics: keep travel time under 60 minutes where possible. If using a shuttle to return to the start point, factor in 20–40 minutes for vehicle repositioning. Confirm access permission if paddling through private land or DOC-managed areas.
Toilets, shelter, water access: toilets ideally at put-in or take-out, or a dig-a-hole protocol with hand sanitiser if not available; shelter out of wind and rain for briefing and post-session changes; students bring their own water bottles: river water is not safe to drink even if it looks clear.
“Plan B” locations: a backup river section with lower gradient and wider channels if levels are too high; knowledge of which sections maintain enough water year-round if levels are too low; a flatwater lake or estuary session as a lower-risk alternative.
Best venue types in New Zealand
- Grade 1 beginner rivers: gentle current, small riffles, few obstacles, clear channels. Examples: lower Waimakariri (Canterbury), Pelorus River lower sections (Marlborough), Maitai River (Nelson), Clutha River gentle sections (Otago).
- Grade 1–2 progression rivers: moderate current, small rapids with clear routes, good eddies for practice. Examples: Mohaka River (Hawke’s Bay), Rangitīkei River sections (Manawatū), Buller River lower reaches (West Coast).
- Ideal features to look for: road access at put-in and take-out, clear water with good visibility, multiple eddies for regrouping, predictable flow (not affected by hydro releases), escape routes, and a scenic environment.
8. Session Structure Teachers Can Follow
1. Arrival and set-up (15–20 minutes): headcount on arrival; establish boundaries; students apply sunscreen, fill water bottles, use toilets; distribute and fit safety gear (PFDs, helmets, wetsuits) with an instructor checking each student.
2. Briefing (15–20 minutes): explain the session plan; teach signals and commands (stop, regroup, help needed, all clear); establish the buddy system; cover the capsize procedure (wet exit, hold onto kayak, swim to shore or eddy); identify specific hazards on today’s section; check understanding with a quick quiz.
3. Warm-up (10–15 minutes): launch in calm water (eddy or pool); practise basic strokes (forward, reverse, sweep turns); test the wet exit in controlled conditions with an instructor standing nearby; get comfortable with kayak responsiveness before entering current.
4. Skill build (20–30 minutes): choose a progression appropriate to group ability: eddy turns (enter current briefly, turn into the eddy, repeat), ferry gliding (angling across current without being swept downstream), or basic river running (short sections of current, regrouping in eddies).
5. Main challenge (40–90 minutes depending on session length): a river journey downstream using the skills learned with frequent regroups; rotation stations (some paddling, others practising land-based river safety); or a shared objective navigating a specific feature together. Build in rest breaks every 20–30 minutes.
6. Cool-down and pack out (15–20 minutes): finish in calm water if possible; land kayaks carefully and carry above the waterline; remove and pack safety gear properly; a quick rinse of gear if possible; change into warm dry clothes and have a hot drink.
7. Final headcount and debrief (10 minutes): headcount before departing the site; quick circle debrief (see How to Debrief Outdoor Experiences); acknowledge achievements and thank the group.
9. Behaviour Management
For strategies on managing risk-takers, refusers, disengaged students, and creating positive reinforcement outdoors, see Behaviour Management Outdoors.
10. Reflection and Debrief
For debrief frameworks, facilitation tips, curriculum links, and reflection techniques, see How to Debrief Outdoor Experiences.
11. Common Issues and Fixes
Weather changes
Issue: rain starts during the session or the forecast changes unexpectedly. Fix: light rain is usually manageable if students are dressed properly. Monitor river level: if it starts rising or becomes discoloured, exit immediately. Have a shortened route option pre-planned.
Fear and tears
Issue: a student becomes overwhelmed, cries, or refuses to continue. Fix: bring them to calm water or shore, speak privately, validate their feelings. Offer scaled-back options: very calm sections, paddling tandem with a buddy, or a break on shore. Don’t force participation but keep the door open to rejoin when ready.
Gear problems
Issue: a PFD does not fit, a helmet slips, a wetsuit tears, or a paddle breaks. Fix: carry spare equipment in various sizes and check all gear before launch, not just at the start of the day. Have at least one spare paddle per group. If critical safety gear fails (helmet, PFD), that student sits out until it’s replaced.
Group bottlenecks
Issue: students waiting around too long, losing focus or getting cold. Fix: use rolling starts (first group launches while the second gets a final briefing), keep explanations concise, and have backup activities ready for those waiting.
Energy crashes and dehydration
Issue: students run out of energy, get headaches, or struggle in the final section. Fix: build in regular snack and water breaks every 30–40 minutes minimum. If a student shows signs of “bonking” (confusion, irritability, weakness), stop immediately, get them warm and fed, and consider shortening the route.
12. Activity Variations and Extensions
Easier version (confidence-building): Grade 1 water only, a small loop section for repeated eddy-turn practice, tandem kayaks available, shorter sessions (1.5 hours).
Standard version: Grade 1–2 water with small rapids and clear channels, a 1–3km river journey with skill practice and regular regroups, half-day duration.
Challenge version: Grade 2 water with more technical features, a longer journey (5–8km), leadership roles for students, added problem-solving elements (time goals, navigation decisions, rescue scenarios), full-day duration with deeper environmental education.
13. Cost and Resourcing Notes
What tends to drive cost:
| Cost driver | Typical range |
|---|---|
| Qualified instructors (specialised river/rescue training) | $60–$100+ per hour per instructor |
| Kayaks | $600–$1,200 each to purchase |
| Paddles | $80–$200 each |
| PFDs | $100–$150 each |
| Helmets | $60–$100 each |
| Wetsuits | $100–$200 each |
A full equipment set for 20 students represents a $20,000–$40,000 investment if purchasing outright: most schools use a provider or hire gear instead. Transport (kayak trailers, shuttle services) and site access fees (DOC concessions or private landowner permission) add further cost.
Ways to keep it affordable: rotation stations so smaller groups need fewer boats and instructors; shared gear arrangements with neighbouring schools or outdoor education centres; shorter two-hour taster sessions rather than full-day programmes; local venues within 30 minutes to minimise transport costs; investing in upskilling a staff member with kayaking qualifications ($1,000–$2,000 initial cost, paying off over multiple years).
14. Next Steps for Schools
- Check readiness: review your school’s capability (qualified staff, equipment, budget) and decide on teacher-led, provider-led, or hybrid.
- Confirm venue: scout potential river sections or consult local providers about suitable locations for your group’s age and ability.
- Brief parents: send information at least 2–3 weeks in advance using Parent Communication for Water Activities.
- Book a provider (if used): contact providers early, especially in peak camp season, and use the questions in Working with Outdoor Education Providers.
- Run pre-camp prep: use Student Preparation for Water Activities to build student confidence and fitness in the weeks before camp.
With the right planning and safety systems in place, moving-water kayaking gives students an unforgettable opportunity to build confidence, work together, and connect with Aotearoa’s waterways.
Key Safety Standards and Guidelines
- Water Safety New Zealand (WSNZ): watersafety.org.nz
- Education Outdoors New Zealand (EONZ): eonz.org.nz
- Maritime NZ: maritimenz.govt.nz
- NZ Outdoor Instructors Association (NZOIA): nzoia.org.nz
Leave a Reply
You must be logged in to post a comment.