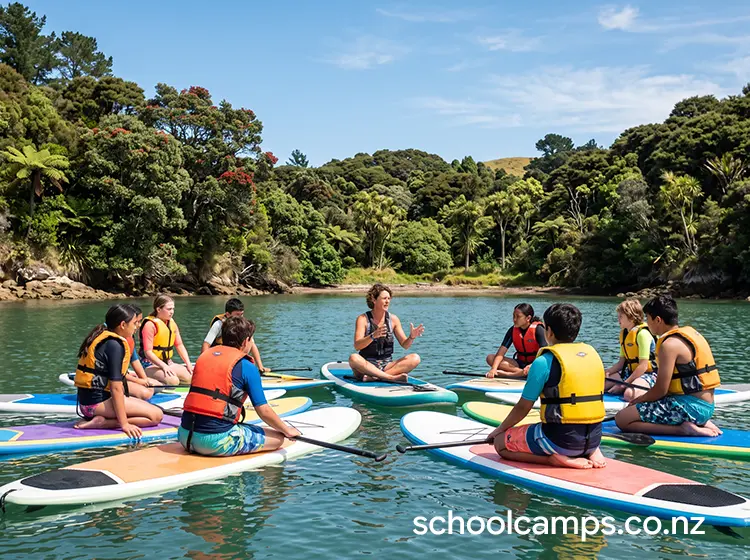
 This guide covers activity-specific elements of stand-up paddleboarding. For broader topics that apply across all water activities, see our standalone reference guides:
- Working with Outdoor Education Providers
- Parent Communication for Water Activities
- Student Preparation for Water Activities
- Behaviour Management Outdoors
- How to Debrief Outdoor Experiences
- Water Safety Foundations
Looking for a longer paddle rather than a skills session? See SUP Journey / Distance Paddle.
1. Quick Overview
Stand-up paddleboarding (SUP) on flatwater involves students standing on a wide, stable board and using a long paddle to propel themselves across calm water such as lakes, harbours, sheltered bays, or slow-moving rivers. Unlike surfing, flatwater SUP focuses on balance, efficient paddling technique, and exploring water environments in controlled conditions. Students typically start kneeling or sitting to get comfortable, then progress to standing as their confidence builds.
SUP works well as a school camp activity because it delivers quick wins for nervous beginners while offering enough complexity to engage confident students. The learning curve is gentle enough that most students can stand and paddle within 15–20 minutes, yet the activity supports deeper skill development in reading water, efficient movement, and group coordination. Because everyone falls in at some point, SUP normalises making mistakes and getting back up, building resilience in a literal, physical way. It also develops outdoor skills that transfer to other water activities: reading wind and current, managing equipment responsibly, and understanding how weather affects conditions.
Typical duration options
- Taster session (60–90 minutes): a briefing, gearing up, basic skill instruction, and 30–40 minutes on the water. Students typically achieve standing and basic paddling.
- Half-day session (2.5–3 hours): more exploration, games, and skill challenges once students are comfortable: relay races, tandem paddling, or navigating a simple course.
- Full-day session (5–6 hours): usually involves a journey element: paddling to a destination for lunch or exploring different parts of a harbour or lake. Best suited for Year 7 and up.
2. Learning Outcomes Teachers Can Actually Use
Personal skills: most students achieve standing within the first session, providing a concrete “I did it” moment; learning to regulate breathing and work through initial wobbles without giving up; falling off and getting back on repeatedly builds tolerance for setback; balancing on an unstable surface develops proprioception and core strength.
Social skills: students naturally support each other, celebrating small wins and offering practical tips; learning to use clear verbal signals and visual awareness spread across open water; confident paddlers help nervous beginners (tuakana-teina); working together to manage equipment and solve problems builds group cohesion.
Outdoor skills: reading current, wind drift, and how the board responds to paddle strokes; learning to carry, launch, and care for equipment safely, including how a leash works; observing wind direction and wave patterns as conditions change through a session; quiet movement on water allows students to notice birds, fish, and shoreline features.
Thinking skills: choosing when to kneel vs stand, which direction to paddle, when to rest; working out how to turn the board, return to the group, or retrieve a dropped item; tracking location relative to boundaries, other paddlers, and shore; understanding how paddle angle, stance, and stroke speed affect board movement.
Wellbeing: achieving something that initially seemed difficult or scary builds personal pride and self-efficacy; managing frustration or anxiety in a physically demanding, unfamiliar environment; stretching comfort zones in a controlled, supported setting; moments of calm paddling encourage focus and presence.
3. Best Year Levels and Group Sizes
Suggested year levels
- Year 4–6: works well in calm, shallow conditions with close supervision. Shorter sessions (60–90 minutes), staying within a clearly marked area. Expect more kneeling and sitting: success is about comfort and control, not standing for the whole session.
- Year 7–10: have the strength, coordination, and focus for longer sessions and more challenging objectives: half-day or full-day sessions, simple courses, light wind or minor current. Respond well to games, races, and leadership challenges.
Group size guidance
- Whole class (20–30 students): possible with adequate supervision and boards, but works best in rotation: half the class on water while the other half does a shore-based activity, then swap.
- Small rotations (8–12 students per session): ideal for safety, skill development, and meaningful instructor feedback.
Ratios and supervision
- Provider-led: typically 1:8–1:12 depending on conditions, student age, and ability. Instructors stay on the water (on their own SUP or in a support kayak/rescue boat).
- Teacher-led: tighter ratios of 1:6–1:8 on water, with at least one additional supervisor on shore for headcounts, emergency comms, and managing students waiting to go out.
- Hybrid: one teacher on shore, one available to support on water even if not actively instructing.
4. Working with Providers
Deciding whether to run teacher-led or provider-led sessions, questions to ask providers, and what teachers should still do when working with external instructors:
See: Working with Outdoor Education Providers: for this activity, look specifically for Paddle NZ awards or Water Safety NZ credentials.
5. Planning Checklist
Permissions and communications
For parent letter templates, consent requirements, and addressing common parent concerns, see Parent Communication for Water Activities.
Skills and fitness preparation
For pre-camp fitness activities, skill practices, and confidence-building exercises, see Student Preparation for Water Activities.
Gear and clothing
What’s typically provided: SUP boards (usually 10–12 feet for stability), adjustable paddles, leashes (ankle or calf straps), PFDs or buoyancy aids, and wetsuits in cooler months.
What students bring: swimwear or clothes that can get fully wet (quick-dry shorts and rash tops work well); footwear that stays on in water: old trainers, surf shoes, jandals with a back strap, or neoprene booties; towel and complete change of warm dry clothes; sun protection (rash top, reef-safe sunscreen, sunglasses with a retaining strap, hat).
Cold/wet management: layer up immediately after the session: even in summer, wind and wet clothing cause rapid cooling. Bring a warm fleece, beanie, and warm drink. If water is below 15°C, wetsuits are essential.
Accessibility and inclusion
Confidence levels: nervous students can start sitting or kneeling and stay that way for the entire session: this is legitimate participation, not failure. Use buddy boards (two students sharing one large board) for extra stability and social support. Set a closer boundary for anxious students.
Neurodiversity: provide clear, visual instructions and demonstrate each step; allow noise-reducing earplugs if wind or group noise is overwhelming; offer a predictable structure with processing time before rushing from briefing to water.
Physical needs: wider, more stable boards work better for students with balance or coordination difficulties; kneeling or sitting positions are completely valid; pair students who need physical support with a confident buddy or instructor.
6. Safety, Risk, and Good Practice
Hazards to think about: immersion and cold water shock (students will likely fall in, especially when learning: cold water below 15°C significantly increases risk); wind and drift (even light wind can push boards quickly, separating students from the group); collision with boards or paddles; entanglement in leashes; sun exposure and dehydration; fatigue and overconfidence leading students to paddle too far or ignore boundaries; underwater hazards (rocks, logs, sudden depth changes).
Key controls: a thorough briefing covering how to fall safely, how to get back on the board, and the emergency signal; clear boundaries and a “no-go” zone for boat traffic, strong current, or deep water; a buddy system with regular check-ins; constant supervision with instructors on water positioned to see all students and a shore-based supervisor maintaining headcounts; weather monitoring with a clear wind speed threshold; PFDs and leashes worn correctly at all times.
Roles on the day: a designated decision-maker (usually the lead instructor or senior teacher) with final authority to stop, modify, or continue; a first aid and emergency comms holder, often the shore-based supervisor; on-water instructor(s) who actively manage students and monitor conditions; a shore-based supervisor managing headcounts and supporting entry/exit.
When to stop or switch plans
Stop immediately if: wind gusts exceed your threshold (typically 20+ knots for beginners); lightning is seen or thunder heard; a student has a medical emergency; equipment failure compromises safety (a broken leash, a damaged board in rough water); the instructor becomes unable to supervise effectively.
Consider stopping or modifying if: multiple students show signs of cold stress; students are drifting consistently beyond boundaries despite instruction; behaviour becomes unsafe; conditions are worsening steadily; students are too fatigued to paddle back effectively.
What a safe session looks like
- ✓ All students wearing properly fitted PFDs before entering the water
- ✓ Clear boundaries understood and respected; students respond quickly to recall signals
- ✓ Instructors positioned to maintain visual contact with all students: no one isolated or out of sight
- ✓ Students falling in and getting back on independently or with minimal help: this is normal learning
- ✓ Gear handled carefully on shore
- ✓ Regular headcounts, at least every 10 minutes
Common mistakes to watch for: standing too far back on the board (causes the nose to lift and instability); gripping the paddle too tightly or incorrectly (leads to fatigue and poor technique); looking down at the board instead of ahead (reduces balance); paddling too fast without proper technique; not attaching the leash.
7. Site Selection and Conditions
What makes a location suitable: calm, flatwater with minimal current (less than 0.5 knots); sheltered from wind by surrounding land, trees, or natural features; depth appropriate for the group (1–1.5m near shore so nervous students can touch bottom, 1.5–3m in the operating area); clear of submerged rocks, logs, weed beds, or debris; minimal boat traffic.
Access and facilities: easy, safe entry and exit points; space on shore for briefing and equipment (2–3 square metres per student); vehicle access; toilets within 5–10 minutes’ walk; shelter from sun and rain; fresh water for rinsing gear.
Best venue types in New Zealand: sheltered harbours and bays (inner Tauranga Harbour, Akaroa Harbour, Picton foreshore); calm lakes (Lake Pupuke, Lake Wanaka in calm conditions, Lake Ngatu); slow-moving, wide rivers with minimal current (lower reaches of the Whanganui, Motu, or Mokau); estuaries at high tide with minimal tidal flow.
Travel time and logistics: aim for venues within 30–45 minutes of your accommodation base. Check road access, since gravel roads or long driveways slow down large buses. Allow 15–20 minutes for unloading and inflating boards if using inflatable SUPs.
“Plan B” locations: a more sheltered backup location checked the night before or early morning; a shallower, smaller area of the same venue; a shore-based SUP skills session (balancing on boards on grass, practising paddle strokes on land) if conditions are unsuitable; some community pools allow SUP sessions, ideal for first-timers or cold weather.
8. Session Structure Teachers Can Follow
This run-sheet works for a 90-minute taster session: adjust timing for longer sessions.
1. Arrival and set-up (10 minutes): headcount, toilet check, gear distribution and fit check, a boundaries walk pointing out landmarks and no-go zones.
2. Briefing (10–15 minutes): expectations (listening when called, staying within boundaries, respecting gear, helping each other); signals (stop-and-look, recall, emergency); buddy system assigned; how to fall safely and get back on the board demonstrated; PFD and leash check.
3. Warm-up (5 minutes): simple stretches and balance challenges on land; light jogging and arm circles with paddles; students set a personal goal for the session.
4. Skill build (20–25 minutes): a simple progression; kneeling (5 minutes, paddling a few strokes each side), one knee up (5 minutes, the transition position), standing (5–7 minutes, feet hip-width apart, looking at the horizon), basic turning (5 minutes, paddle on one side or reverse stroke). Instructor circulates giving individual feedback.
5. Main challenge (20–25 minutes): choose one; an exploration paddle to a designated point and back; a relay race around a buoy; balance challenges (kneel, stand, sit, stand again without falling); or tandem boarding.
6. Cool-down and pack out (10 minutes): recall signal, an easy final paddle to bring heart rate down, boards brought to shore and placed flat, gear collected, students change into dry clothes immediately.
7. Final headcount and debrief (5–10 minutes): headcount, then a quick circle debrief (see How to Debrief Outdoor Experiences) and connection back to camp goals.
9. Behaviour Management
For strategies on managing risk-takers, refusers, disengaged students, and creating positive reinforcement outdoors, see Behaviour Management Outdoors.
10. Reflection and Debrief
For debrief frameworks, facilitation tips, curriculum links, and reflection techniques, see How to Debrief Outdoor Experiences.
11. Common Issues and Fixes
Weather changes
Issue: wind picks up suddenly, making it hard for students to paddle back or stay within boundaries. Fix: recall students immediately, position instructors upwind to intercept drifting boards, have students kneel or sit to lower their centre of gravity and reduce wind resistance. If wind continues to strengthen, end the session early.
Seasickness, fear and tears
Issue: a student feels nauseous or dizzy from the motion of the board. Fix: have them sit or kneel and focus on a fixed point on shore. Bring them back to shore if symptoms persist.
Issue: a student is genuinely frightened and wants to quit. Fix: validate their feelings, offer a smaller achievable goal (“can you sit on the board near the shore for two minutes?”), pair them with a calm supportive buddy, and give them permission to sit out without shame. Never force or ridicule.
Gear problems
Issue: the leash comes undone or breaks. Fix: replace immediately; boards without leashes can drift away quickly. Carry spare leashes.
Issue: an inflatable board gets a puncture. Fix: remove the student from the damaged board immediately; most punctures deflate slowly, so the board may still provide flotation while being towed back. Swap onto a spare board if available.
Group bottlenecks
Issue: half the group waits on shore while the other half paddles, leading to boredom. Fix: run concurrent shore activities (a beach game, environmental scavenger hunt), use shorter 15–20 minute rotations, and assign roles to waiting students.
Energy crashes and hydration
Issue: students run out of energy halfway through. Fix: build in a rest break with water and a snack, watch for signs of fatigue (slow paddling, drifting), and bring students in for a break.
12. Activity Variations and Extensions
Easier version (confidence-building): operate in water where students can touch the bottom (waist-deep); kneeling only, standing optional; boundaries within 20 metres of shore; buddy boards for extra stability; a shorter 45–60 minute session.
Standard version: progressing from kneeling to standing; simple navigation to a marker and back; operating within 50–100 metres of shore; 90 minutes to 2 hours; relays and balance challenges.
Challenge version: an extended exploration to a destination 500m–1km away; a navigation challenge using visual landmarks or a simple map; leadership roles for students; time goals; students managing their own gear and supporting less confident peers. Example activities: SUP orienteering with markers around a bay, rescue practice, and environmental observation challenges.
13. Cost and Resourcing Notes
What tends to drive cost:
| Cost driver | Typical range |
|---|---|
| Qualified instructors | $50–$100 per hour |
| Gear hire (board, paddle, PFD, wetsuit) | $20–$50 per student for a half-day |
| Site access / permit fees | Varies by venue; check DOC concessions for conservation sites |
Full-day sessions cost significantly more than tasters due to extended instructor time and higher staffing needs.
Ways to keep it affordable: rotation stations so fewer boards and instructors are needed at once; shared gear arrangements with other schools or community groups: some regional sports trusts have SUP gear available at reduced rates; shorter 60–75 minute taster sessions; local venues to minimise transport costs; using inflatable SUPs, which are often cheaper to hire, easier to transport, and more forgiving for beginners; negotiating provider packages for multi-day or off-peak bookings.
14. Next Steps for Schools
- Check readiness: do you have staff with SUP qualifications, or will you need a provider? Have you identified a suitable venue within reasonable travel distance?
- Confirm venue: visit the site in advance or research thoroughly, and confirm any permits or fees required.
- Brief parents: use Parent Communication for Water Activities to send a clear, informative letter and collect updated consent.
- Book a provider (if used): contact providers early (popular operators book out months ahead in summer) and use the questions in Working with Outdoor Education Providers.
- Run a short pre-camp skills session: use Student Preparation for Water Activities to build balance, core strength, and water confidence in the weeks before camp.
Key Safety Standards and Guidelines
- Water Safety New Zealand (WSNZ): watersafety.org.nz
- Education Outdoors New Zealand (EONZ): eonz.org.nz
- Maritime NZ: maritimenz.govt.nz
- Paddle NZ: paddlenz.org.nz
Leave a Reply
You must be logged in to post a comment.